Securing workstations against modern threats is challenging. It seems like every week there’s some new method attackers are using to compromise a system and user credentials.
Post updated on March 8th, 2018 with recommended event IDs to audit.
The best way to create a secure Windows workstation is to download the Microsoft Security Compliance Manager (currently at version 4.0) and select “Security Compliance” option under the operating system version for which you want to create the security baseline GPO. Review the options, change as needed, and export as a GPO Backup (folder). Create a new empty GPO and Import the settings from the SCM GPO backup. Then apply this newly created GPO to your workstations. This will improve your workstation security baseline if you have minimal security settings already configured, especially if you have no existing workstation GPO.
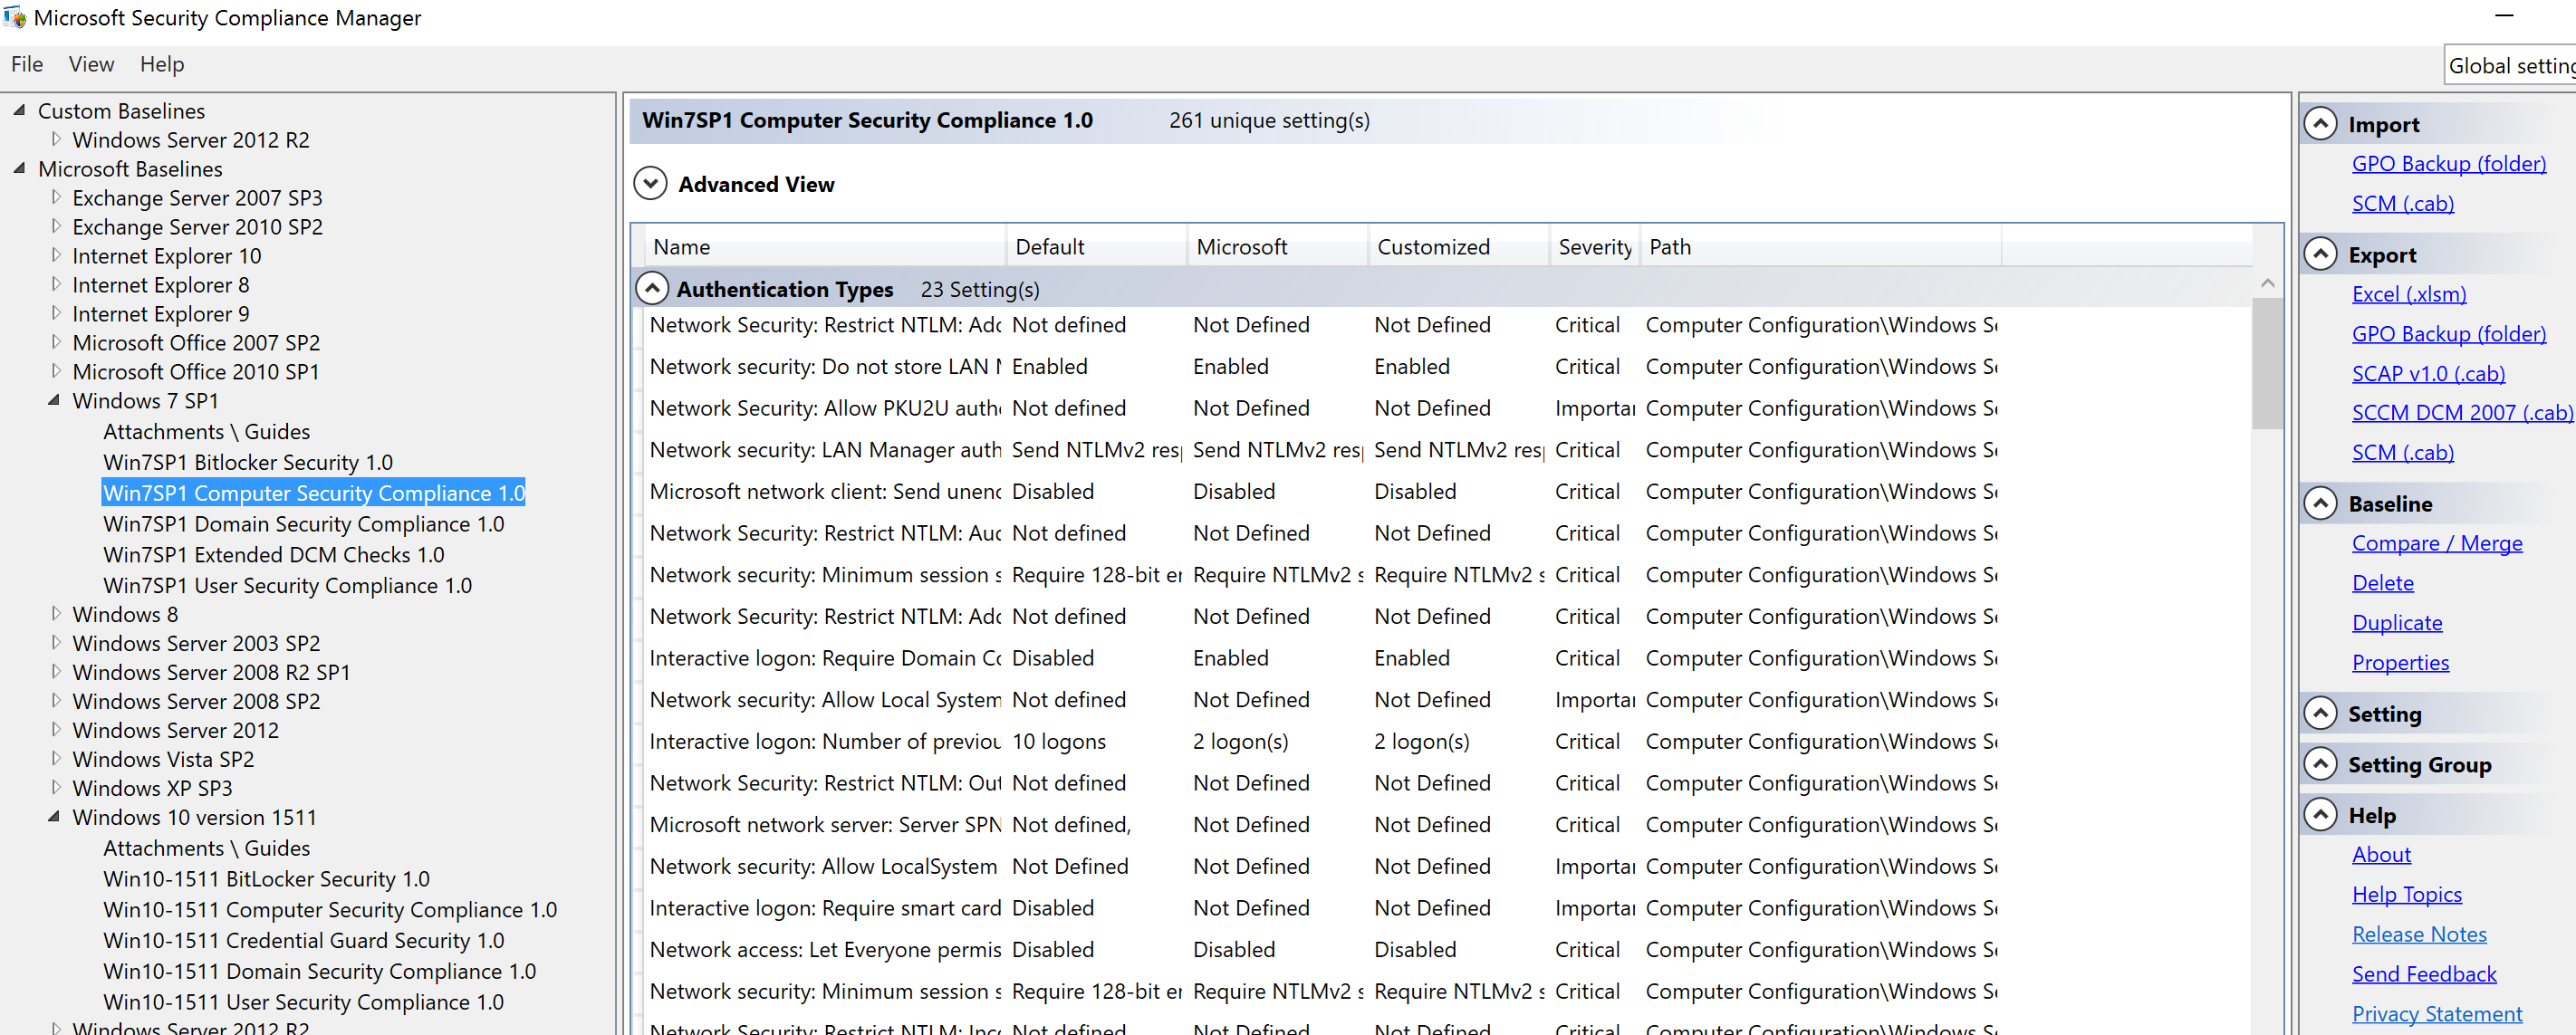
As part of developing your Windows Workstation Security Baseline GPO, there are several large organizations that have spent time and money determining what’s “secure”:
- DoD STIG: http://iase.disa.mil/stigs/os/windows
- DoD Windows 10 Secure Host Baseline files: https://github.com/iadgov/Secure-Host-Baseline
- Australian Information Security Manual: http://www.asd.gov.au/infosec/ism/index.htm
- CIS Benchmarks: https://benchmarks.cisecurity.org/downloads/browse/?category=benchmarks.os.windows
Microsoft Administrative Templates for controlling settings via Group Policy are here:
- Windows 7 & Windows Server 2008 R2: https://www.microsoft.com/en-us/download/details.aspx?id=6243
- Windows 8.1 & Windows Server 2012 R2: https://www.microsoft.com/en-us/download/details.aspx?id=43413
- Windows 10 (v1607) & Windows Server 2016: https://www.microsoft.com/en-us/download/details.aspx?id=53430
- Office 2010: https://www.microsoft.com/en-us/download/details.aspx?id=18968
- Office 2013: https://www.microsoft.com/en-us/download/details.aspx?id=35554
- Office 2016: https://www.microsoft.com/en-us/download/details.aspx?id=49030
Note that these locations are subject to change with further updates.
Group Policy Settings Reference for Windows and Windows Server
Windows 10 (v1607) & Windows Server 2016 security configuration baseline settings: https://blogs.technet.microsoft.com/secguide/2016/10/17/security-baseline-for-windows-10-v1607-anniversary-edition-and-windows-server-2016/
If you already have a GPO configuring workstation security, you can compare what you have to the SCM generated “Security Compliance” GPO using Microsoft’s Policy Analyzer.
Beyond the standard “Windows security things”, there are legacy and often unused components that linger and are carried forward from earlier Windows versions that are often no longer needed, but kept for compatibility reasons. This post covers many of these as well as other good security practices and configuration.
Obviously, you should move to the most recent version of Windows and rapidly deploy security patches when they are available.
The following items are recommended for deploying a secure Windows workstation baseline, though test first since some of these may break things.
Securing Windows Workstation:
- Deploying Free/Near-Free Microsoft Tools to Improve Windows Security
- Deploy Microsoft AppLocker to lock down what can run on the system.
-
Deploy current version of EMET with recommended software settings.
-
Deploy LAPS to manage the local Administrator (RID 500) password.
- Force Group Policy to reapply settings during “refresh”
- Disable Windows Legacy & Typically Unused Features
-
Disable Net Session Enumeration (NetCease)
-
Disable WPAD
- Disable LLMNR
-
Disable Windows Browser Protocol
-
Disable NetBIOS
-
Disable Windows Scripting Host (WSH) & Control Scripting File Extensions
-
Deploy security back-port patch (KB2871997).
-
Prevent local Administrator (RID 500) accounts from authenticating over the network
-
Ensure WDigest is disabled
- Remove SMB v1 support
-
-
Windows 10 & Windows 2016
-
Windows 10 & 2016 System Image Configuration
- Block Untrusted Fonts
- Enable Credential Guard
- Configure Device Guard
-
- Application Security Settings
-
Disable Microsoft Office Macros
-
Disable Microsoft Office OLE
-
- Additional Group Policy Security Settings
- Configure Lanman Authentication to a secure setting
- Configure restrictions for unauthenticated RPC clients
- Configure NTLM session security
Free or Near Free Microsoft Tools to Improve Windows Security
Deploy AppLocker to lock down what can run on the system
Microsoft AppLocker provides out of the box application whitelisting capability for Windows.
It is highly recommended to use AppLocker to lock down what can be executed on Windows workstations and servers that require high levels of security.
AppLocker can be used to limit application execution to specific approved applications. There are several difference phases I recommend for AppLocker:
- Phase 1: Audit Mode – audit all execution by users and the path they were run from. This logging mode provides information on what programs are run in the enterprise and this data is logged to the event log.
- Phase 2: “Blacklist Mode” – Configure AppLocker to block execution of any file in a user’s home directory, profile path, and temporary file location the user has write access to, such as c:\temp.
- Phase 3: “Folder Whitelist Mode” – Configure AppLocker to build on Phase 2 by adding new rules to only allow execution of files in specific folders such as c:\Windows and c:\Program Files.
- Phase 4: “Application Whitelisting” – Inventory all applications in use in the enterprise environment and whitelist those applications by path and/or file hash (preferably digital signature). This ensures that only approved organization applications will execute.
AppLocker Group Policies are created and managed here:
- Computer Configuration\Policies\Windows Settings\Security Settings\Application Control Policies\AppLocker
Review the AppLocker Policies Design Guide for deployment help.
Expected Level of Effort:
Medium High
Expected Impact:
This is likely to break things in the enterprise, please test first.
Deploy current version of EMET with recommended software settings
Microsoft Enhanced Mitigation Experience Toolkit (EMET) helps prevent application vulnerabilities from being exploited (including mitigating many 0-days). It’s a free product that effectively “wraps” popular applications so when vulnerability exploitation is attempted, the attempt is stopped at the “wrapper” and doesn’t make it to the OS.
There are several profiles for deployment:
- Default configuration.
- Recommended Software.
- Popular Software.
At the very least, deploy EMET with the default configuration to harden core applications.
Use the EMET administration templates (EMET.admx & EMET.adml) enable EMET management via GPO and are found in the <SystemDrive>\Program Files\EMET\Deployment\Group Policy Files folder on a system with EMET installed. Copy these to the Active Directory GPO Central Store.
Customize EMET configuration via Group Policy
Test with applications since some “more secure” settings may cause crashes with programs like Outlook and Chrome as well as some security software.
Note that Microsoft EMET is End of Life (EOL) in 2018 since it was developed by Microsoft to help improve certain elements of Windows security when it was released. Windows 10 includes greatly improved security which exceeds most of the EMET enhancements.
Expected Level of Effort:
Medium
Expected Impact:
This may break things in the enterprise, please test first.
Use LAPS to manage the local Administrator (RID 500) password
Microsoft Local Administrator Password Solution (LAPS) provides automated local administrator account management for every computer in Active Directory (LAPS is best for workstation local admin passwords). A client-side component installed on every computer generates a random password, updates the (new) LAPS password attribute on the associated AD computer account, and sets the password locally. LAPS configuration is managed through Group Policy which provides the values for password complexity, password length, local account name for password change, password change frequency, etc.
Expected Level of Effort:
Low to Medium
Expected Impact:
This may break things in the enterprise, please test first.
Force Group Policy to reapply settings during “refresh”
The default Group Policy application behavior is to “refresh the group policy” on the client, though this doesn’t actually mean the GPO settings are re-applied. By default, the GPO’s settings are only reapplied if the GPO was modified prior to the refresh. This means that one could reverse a GPO enforced setting via the computer’s registry (typically with admin rights) and the unauthorized setting remains until the GPO is modified (if it ever is), after which the GPO settings are re-applied.
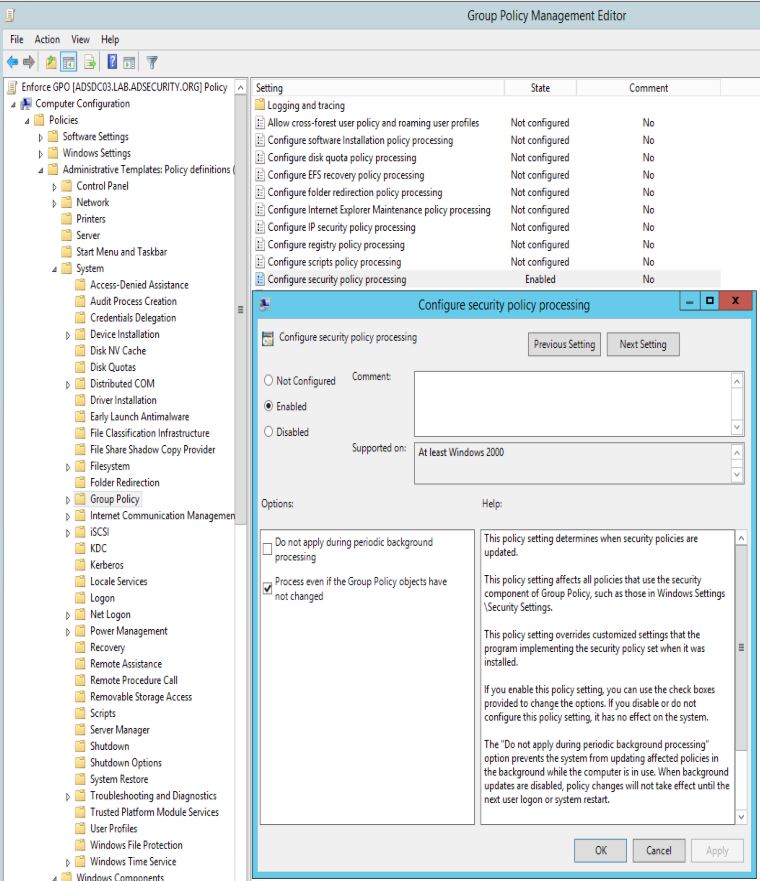
After testing, change the Group Policy default setting to re-apply GPO settings at every refresh – “Process even if the Group Policy objects have not changed”. This does have a potential performance hit on the client, but will ensure all GPO enforced settings are re-applied.
Computer Configuration, Policies, Administrative Templates, System, Group Policy, Configure security policy processing: Set to Enabled.
Also check the box for “Process even if the Group Policy objects have not changed”
It’s also recommended to configure the same settings for each of the following:
- Computer Configuration, Policies, Administrative Templates, System, Group Policy, Configure registry policy processing
- Computer Configuration, Policies, Administrative Templates, System, Group Policy, Configure scripts policy processing
- As well as any other policy settings as needed.
Enable LSA Protection/Auditing
Starting with Windows 8.1/Windows Server 2012 R2, LSA Protection can be enabled with a registry key addition to prevent unsigned code from interacting with LSASS (like Mimikatz). Before enabling LSA Protection, it’s a best practice to enable LSA Auditing to know what code may be interacting with LSASS which would be blocked otherwise.
From Microsoft’s “Configuring Additional LSA Protection“:
The LSA, which includes the Local Security Authority Server Service (LSASS) process, validates users for local and remote sign-ins and enforces local security policies. The Windows 8.1 operating system provides additional protection for the LSA to prevent reading memory and code injection by non-protected processes. This provides added security for the credentials that the LSA stores and manages. The protected process setting for LSA can be configured in Windows 8.1, but it cannot be configured in Windows RT 8.1. When this setting is used in conjunction with Secure Boot, additional protection is achieved because disabling the HKEY_LOCAL_MACHINE\SYSTEM\CurrentControlSet\Control\Lsa registry key has no effect.
For an LSA plug-in or driver to successfully load as a protected process, it must meet the following criteria:
- Signature verificationProtected mode requires that any plug-in that is loaded into the LSA is digitally signed with a Microsoft signature. Therefore, any plug-ins that are unsigned or are not signed with a Microsoft signature will fail to load in LSA. Examples of these plug-ins are smart card drivers, cryptographic plug-ins, and password filters.LSA plug-ins that are drivers, such as smart card drivers, need to be signed by using the WHQL Certification. For more information, see WHQL Release Signature (Windows Drivers).LSA plug-ins that do not have a WHQL Certification process, must be signed by using the file signing service for LSA.
- Adherence to the Microsoft Security Development Lifecycle (SDL) process guidanceAll of the plug-ins must conform to the applicable SDL process guidance. For more information, see the Microsoft Security Development Lifecycle (SDL) Appendix.Even if the plug-ins are properly signed with a Microsoft signature, non-compliance with the SDL process can result in failure to load a plug-in.
Recommended practices
- Identify all of the LSA plug-ins and drivers that are in use within your organization. This includes non-Microsoft drivers or plug-ins such as smart card drivers and cryptographic plug-ins, and any internally developed software that is used to enforce password filters or password change notifications.
- Ensure that all of the LSA plug-ins are digitally signed with a Microsoft certificate so that the plug-in will not fail to load.
- Ensure that all of the correctly signed plug-ins can successfully load into LSA and that they perform as expected.
- Use the audit logs to identify LSA plug-ins and drivers that fail to run as a protected process.
You can use the audit mode to identify LSA plug-ins and drivers that will fail to load in LSA Protection mode. While in the audit mode, the system will generate event logs, identifying all of the plug-ins and drivers that will fail to load under LSA if LSA Protection is enabled. The messages are logged without blocking the plug-ins or drivers.
To enable the audit mode for Lsass.exe on a single computer by editing the Registry
-
Open the Registry Editor (RegEdit.exe), and navigate to the registry key that is located at: HKEY_LOCAL_MACHINE\SOFTWARE\Microsoft\Windows NT\CurrentVersion\Image File Execution Options\LSASS.exe.
-
Set the value of the registry key to AuditLevel=dword:00000008.
-
Restart the computer.
Analyze the results of event 3065 and event 3066.
- Event 3065: This event records that a code integrity check determined that a process (usually lsass.exe) attempted to load a particular driver that did not meet the security requirements for Shared Sections. However, due to the system policy that is set, the image was allowed to load.
- Event 3066: This event records that a code integrity check determined that a process (usually lsass.exe) attempted to load a particular driver that did not meet the Microsoft signing level requirements. However, due to the system policy that is set, the image was allowed to load.
Expected Level of Effort:
Low to Medium
Expected Impact:
This may break things in the enterprise, please test first.
Event IDs that Matter – Log These
| EventID | Description | Impact |
| 1102/517 | Event log cleared | Attackers may clear Windows event logs. |
| 4610/4611/4614/4622 | Local Security Authority modification | Attackers may modify LSA for escalation/persistence. |
| 4648 | Explicit credential logon | Typically when a logged on user provides different credentials to access a resource. Requires filtering of “normal”. |
| 4661 | A handle to an object was requested | SAM/DSA Access. Requires filtering of “normal”. |
| 4672 | Special privileges assigned to new logon | Monitor when someone with admin rights logs on. Is this an account that should have admin rights or a normal user? |
| 4723 | Account password change attempted | If it’s not an approved/known pw change, you should know. |
| 4964 | Custom Special Group logon tracking | Track admin & “users of interest” logons. |
| 7045/4697 | New service was installed | Attackers often install a new service for persistence. |
| 4698 & 4702 | Scheduled task creation/modification | Attackers often create/modify scheduled tasks for persistence. Pull all events in Microsoft-Windows-TaskScheduler/Operational |
| 4719/612 | System audit policy was changed | Attackers may modify the system’s audit policy. |
| 4732 | A member was added to a (security-enabled) local group | Attackers may create a new local account & add it to the local Administrators group. |
| 4720 | A (local) user account was created | Attackers may create a new local account for persistence. |
On newer versions of Windows, add
| EventID | Description | Impact |
| 3065/3066 | LSASS Auditing – checks for code integrity | Monitors LSA drivers & plugins. Test extensively before deploying! |
| 3033/3063 | LSA Protection – drivers that failed to load | Monitors LSA drivers & plugins & blocks ones that aren’t properly signed. |
| 4798 | A user’s local group membership was enumerated. | Potentially recon activity of local group membership. Filter out normal activity. |
LSA Protection & Auditing (Windows 8.1/2012R2 and newer):
https://technet.microsoft.com/en-us/library/dn408187(v=ws.11).aspx
4798: A user’s local group membership was enumerated (Windows 10/2016):
https://technet.microsoft.com/en-us/itpro/windows/keep-secure/event-4798
A Note About Logon Types (4624)
| Logon Type # | Name | Description | Creds on Disk | Creds in Memory |
| 0 | System | Typically rare, but could alert to malicious activity | Yes | Yes |
| 2 | Interactive | Console logon (local keyboard) which includes server KVM or virtual client logon. Also standard RunAs. | No | Yes |
| 3 | Network | Accessing file shares, printers, IIS (integrated auth, etc), PowerShell remoting | No | No |
| 4 | Batch | Scheduled tasks | Yes | Yes |
| 5 | Service | Services | Yes | Yes |
| 7 | Unlock | Unlock the system | No | Yes |
| 8 | Network Clear Text | Network logon with password in clear text (IIS basic auth). If over SSL/TLS, this is probably fine. | Maybe | Yes |
| 9 | New Credentials | RunAs /NetOnly which starts a program with different credentials than logged on user | No | Yes |
| 10 | Remote Interactive | RDP: Terminal Services, Remote Assistance, R.Desktop | Maybe | Yes* |
| 11 | Cached Interactive | Logon with cached credentials (no DC online) | Yes | Yes |
Auditing Subcategories to Events
| Auditing Subcategory | Event IDs |
| Audit Audit Policy Change | 4719: System audit policy was changed. 4908: Special Groups Logon table modified. |
| Audit Authentication Policy Change | 4706: A new trust was created to a domain.4707: A trust to a domain was removed.
4713: Kerberos policy was changed. 4716: Trusted domain information was modified. 4717: System security access was granted to an account. 4718: System security access was removed from an account. 4739: Domain Policy was changed. 4865: A trusted forest information entry was added. 4866: A trusted forest information entry was removed. 4867: A trusted forest information entry was modified. 4706: A new trust was created to a domain. 4707: A trust to a domain was removed. |
| Audit Computer Account Management | 4741: A computer account was created.4742: A computer account was changed.
4743: A computer account was deleted. |
| Audit DPAPI Activity | 4692: Backup of data protection master key was attempted.4693: Recovery of data protection master key was attempted.
4695: Unprotection of auditable protected data was attempted. |
| Audit Kerberos Authentication Service | 4768: A Kerberos authentication ticket (TGT) was requested4771: Kerberos pre-authentication failed
4772: Kerberos authentication ticket request failed |
| Audit Kerberos Service Ticket Operation | 4769: A Kerberos service ticket (TGS) was requested4770: A Kerberos service ticket was renewed |
| Audit Logoff | 4634: An account was logged off. |
| Audit Logon | 4624: An account was successfully logged on.4625: An account failed to log on.
4648: A logon was attempted using explicit credentials. |
| Audit Other Account Logon Events | 4648: A logon was attempted using explicit credentials4649: A replay attack was detected.
4800: The workstation was locked. 4801: The workstation was unlocked. 5378: The requested credentials delegation was disallowed by policy. |
| Audit Other Object Access Events | 4698: A scheduled task was created.4699: A scheduled task was deleted.
4702: A scheduled task was updated. |
| Audit Process Creation | 4688: A new process has been created. |
| Audit Security Group Management | 4728: A member was added to a security-enabled global group.4729: A member was removed from a security-enabled global group.
4732: A member was added to a security-enabled local group. 4733: A member was removed from a security-enabled local group. 4735: A security-enabled local group was changed. 4737: A security-enabled global group was changed. 4755: A security-enabled universal group was changed. 4756: A member was added to a security-enabled universal group. 4757: A member was removed from a security-enabled universal group. 4764: A group’s type was changed. |
| Audit Security System Extension | 4610: An authentication package has been loaded by the Local Security Authority.4611: A trusted logon process has been registered with the Local Security Authority.
4697: A service was installed in the system. |
| Audit Sensitive Privilege Use | 4672: Special privileges assigned to new logon.4673: A privileged service was called.
4674: An operation was attempted on a privileged object. |
| Audit Special Logon | 4964: Special groups have been assigned to a new logon. |
| Audit User Account Management | 4720: A user account was created.4722: A user account was enabled.
4723: An attempt was made to change an account’s password. 4724: An attempt was made to reset an account’s password. 4725: A user account was disabled. 4726: A user account was deleted. 4738: A user account was changed. 4740: A user account was locked out. 4765: SID History was added to an account. 4766: An attempt to add SID History to an account failed. 4767: A user account was unlocked. 4780: The ACL was set on accounts which are members of administrators groups. 4794: An attempt was made to set the Directory Services Restore Mode. |
Disable Windows Legacy & Typically Unused Features:
Disable Net Session Enumeration (NetCease)
By default, Windows computers allow any authenticated user to enumerate network sessions to it. This means an attacker could enumerate network sessions to a file share hosting home directories or a Domain Controller to see who’s connected to SYSVOL (to apply Group Policy) and determine which workstations each user and admin account is logged into. Bloodhound uses this capability extensively to map out credentials in the network.
Disabling Net Session Enumeration removes the capability for any user to enumerate net session info (Recon).
These settings can also be deployed via Group Policy:
- Run the NetCease PowerShell script on a reference workstation.
- Open the Group Policy Management Console. Right-click the Group Policy object (GPO) that should contain the new preference item, and then click Edit .
- In the console tree under Computer Configuration, expand the Preferences folder, and then expand the Windows Settings folder.
- Right-click the Registry node, point to New , and select Registry Wizard .
- Select the reference workstation on which the desired registry settings exist, then click Next .
- Browse to HKEY_LOCAL_MACHINE\SYSTEM\CurrentControlSet\Services\LanmanServer\DefaultSecurity\
and select the check box for “SrvsvcSessionInfo” from which you want to create a Registry preference item. Select the check box for a key only if you want to create a Registry item for the key rather than for a value within the key. - Click Finish . The settings that you selected appear as preference items in the Registry Wizard Values collection.
Expected Level of Effort:
Low – Medium
Expected Impact:
This is not likely to break things in the enterprise, but please test first.
Disable WPAD
Web Proxy Auto-Discovery Protocol (WPAD) is “a method used by clients to locate the URL of a configuration file using DHCP and/or DNS discovery methods. Once detection and download of the configuration file is complete, it can be executed to determine the proxy for a specified URL.”
Disabling WPAD removes a method Responder uses for passive credential theft. Only disable if not used in environment.
Disable WPAD via Group Policy by deploying the following:
- HKEY_CURRENT_USER\Software\Microsoft\Windows\CurrentVersion\Internet Settings\Wpad
- New DWORD (32-Bit Value) called “WpadOverride” and set to “1”
Disable the service “WinHTTP Web Proxy Auto-Discovery Service”
- Computer Configuration/Policies/Windows Settings/Security Settings/System Services
Note:
Partial mitigation of WPAD issues is possible by installing the Microsoft patch KB3165191 (MS16-077).
This patch hardens the WPAD process and when the system responds to NetBIOS requests.
Expected Level of Effort:
Low-High
Expected Impact:
This is not likely to break things in the enterprise, but please test first.
Disable LLMNR
Link-Local Multicast Name Resolution (LLMNR):
In a nutshell, Link-Local Multicast Name Resolution (LLMNR) resolves single label names (like: COMPUTER1), on the local subnet, when DNS devolution is unable to resolve the name. This is helpful if you are in an Ad-Hoc network scenario, or in a scenario where DNS entries do not include hosts on the local subnet.LLMNR should be disabled if not used since disabling it removes a method Responder uses for passive credential theft.Group Policy:Computer Configuration/Administrative Templates/Network/DNS Client
- Set “Turn Off Multicast Name Resolution” to “Enabled”
Expected Level of Effort:
Low
Expected Impact:
This is not likely to break things in the enterprise, but please test first.
Disable Windows Browser Protocol (Browser Service)
The Browser service (Browser protocol) was used by Windows NT to discover and share information on resources on the local network. This process works by broadcasting on the network and gathering results of this broadcast. A network broadcast is a little like yelling in a room full of people to find a friend every 30 seconds (once you find your friend you note their location, but may forget a little while later and have to re-discover their current location). In order to make this process somewhat less inefficient, a “Master Browser” is elected on each subnet which tracks resources and responds to these resource broadcast requests. In a Windows domain, the PDC acts as the Domain Master Browser to which these subnet Master Browsers forward resource information. Resource discovery using Windows Browser broadcasts was ultimately replaced by Windows Internet Name Service (WINS) and then Active Directory (with DNS). While the necessity of the Browser service has been reduced to almost nil, the Computer Browser service in Windows has continued up through Windows 10 and Windows Server 2012 R2 (though the service was removed in Windows 10 v1607 & Windows Server 2016).
The Windows Browser protocol is another method used by Responder to passively steal credentials.
The Windows Computer Browser service is set to manually start up, though usually starts at Windows start.
![]()
The simple method to disable the Windows browser protocol is to disable the Computer Browser service.
![]()
In Windows 10 v1607 (aka “Anniversary Update”) and Windows Server 2016, the Computer Browser service was removed and is no longer available.

Disable the Computer Browser via Group Policy:
- Open the Group Policy Management Console. Right-click the Group Policy object (GPO) that requires modification, and then click Edit .
- In the console tree under Computer Configuration, expand Policies folder, expand Windows Settings, expand Security Settings, and then expand the System Services folder.
- Scroll down to the “Computer Browser” service, right-click on the service name, and select Properties.
- Check the box to “Define this policy setting”, select Disabled as the service startup mode, and click OK.
Note: Group Policy Preferences can also be used to manage services.
Expected Level of Effort:
Low
Expected Impact:
This is not likely to break things in the enterprise, but please test first.
Disable NetBIOS
NetBIOS is one of the earliest protocols used by Windows.
NetBIOS over TCP/IP is specified by RFC 1001 and RFC 1002. The Netbt.sys driver is a kernel -mode component that supports the TDI interface. Services such as workstation and server use the TDI interface directly, while traditional NetBIOS applications have their calls mapped to TDI calls through the Netbios.sys driver. Using TDI to make calls to NetBT is a more difficult programming task, but can provide higher performance and freedom from historical NetBIOS limitations.
NetBIOS defines a software interface and a naming convention, not a protocol. NetBIOS over TCP/IP provides the NetBIOS programming interface over the TCP/IP protocol, extending the reach of NetBIOS client and server programs to the IP internetworks and providing interoperability with various other operating systems.
The Windows 2000 workstation service, server service, browser, messenger, and NetLogon services are all NetBT clients and use TDI to communicate with NetBT. Windows 2000 also includes a NetBIOS emulator. The emulator takes standard NetBIOS requests from NetBIOS applications and translates them to equivalent TDI functions.
Windows 2000 uses NetBIOS over TCP/IP to communicate with prior versions of Windows NT and other clients, such as Windows 95. However, the Windows 2000 redirector and server components now support direct hosting for communicating with other computers running Windows 2000. With direct hosting, NetBIOS is not used for name resolution. DNS is used for name resolution and the Microsoft networking communication is sent directly over TCP without a NetBIOS header. Direct hosting over TCP/IP uses TCP port 445 instead of the NetBIOS session TCP port 139.
Most versions of Windows in use, can leverage Direct hosting of SMB over TCP/IP, meaning the use of NetBIOS on a network today is only to support legacy systems.
In 2005, Daniel Miessler wrote:
In fact, one can completely disable NetBIOS over TCP/IP on a Windows 2000/XP machine since these new operating systems (via TCP/445) have SMB riding directly on top of TCP rather than on NetBIOS. Microsoft calls this the “direct hosting” of SMB.
Disabling NetBIOS requires some work to determine how and where it’s being used on the network. Disabling it removes a method Responder uses for passive credential theft.
Noted that NetBIOS may be required for legacy systems (older versions of Windows, non-Windows systems, etc).
Disable NetBIOS via (Microsoft) DHCP:
Open Microsoft DHCP.
- In the navigation pane, expand SERVERNAME, expand Scope, right-click Scope Options, and then click Configure Options.
- Click the Advanced tab, and then click Microsoft Windows 2000 Options in the Vendor class list.
- Make sure that Default User Class is selected in the User class list.
- Click to select the 001 Microsoft Disable Netbios Option check box, under the Available Options column.
- In the Data entry area, type 0x2 in the Long box, and then click OK.
Reference: Disabling NetBIOS
On Linux/Unix based DHCP servers, setting option 43 configures DHCP to disable NetBIOS
- option 43 hex 0104.0000.0002
Disable NetBIOS on the Computer:
Go to the properties of all network devices on the computer, TCPIPv4 Properties, Advanced, WINS, Disable NetBIOS over TCP/IP
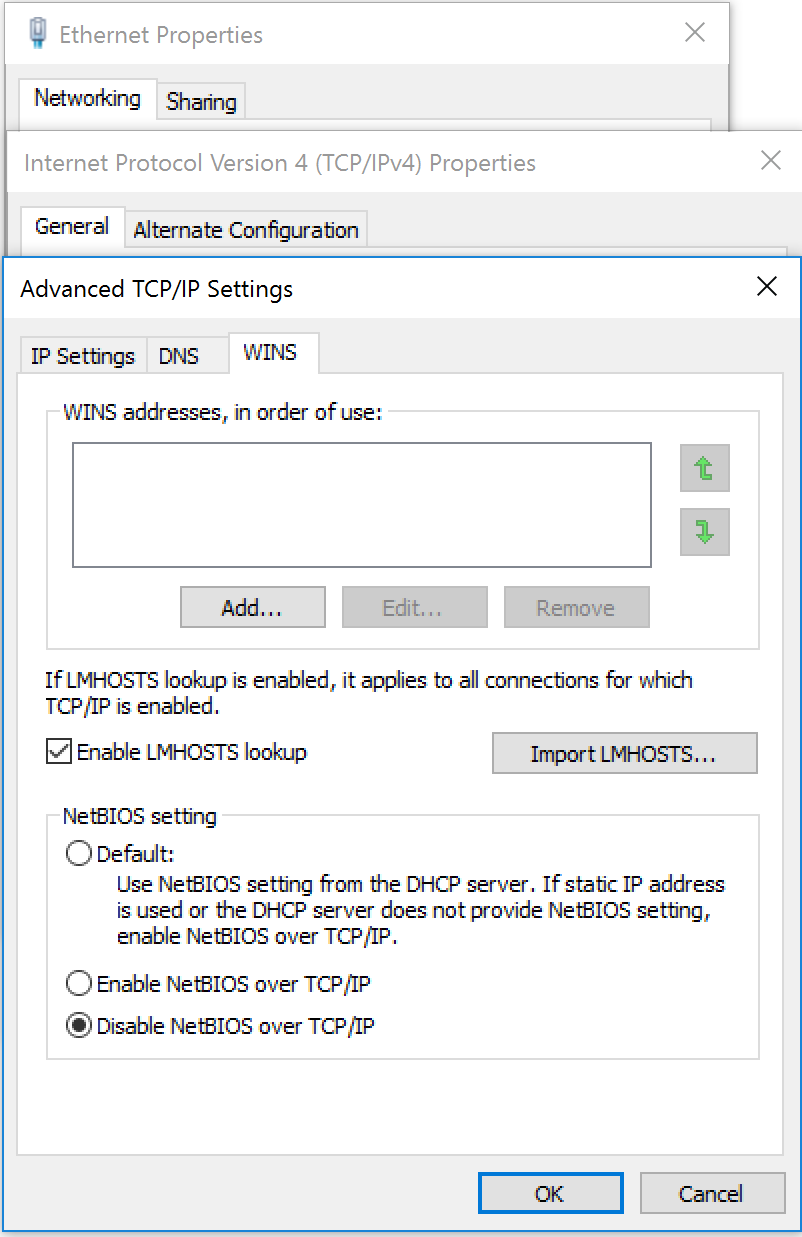
Expected Level of Effort:
Medium-High
Expected Impact:
This is very likely to break things in the enterprise, so please test extensively first.
Disable Windows Script Host (WSH) File Extensions (and others that execute code)
A common method for attackers is to embed or attach a WSH associated file in an email or attached document in order for a user. Disable the WSH extensions not used in the environment by associating them with notepad.exe (this forces the files to be opened in Notepad instead of with WSH). If the organization uses batch files or VBScript, those should be evaluated for disabling prior to changing the file extension. Note that PowerShell files (.ps1, etc) already open by default in notepad.
WSH extensions:
- JScript: .js, .jse [disabling not likely to cause issues, please test first].
- Windows Scripting files: .wsf, .wsh [disabling not likely to cause issues, please test first].
- VBScript: .vbs, .vbe [disabling may cause issues if still using VBScript, please test first].
- HTML for Applications: .hta [disabling not likely to cause issues, please test first].
- CMD Batch: .bat, .cmd (be careful with .cmd) [disabling may cause issues if using batch files, please test first].
- Visual Basic for Applications: Most VBA code is run in another filetype, however .mod opens as video file [disabling not likely to cause issues, please test first].
Disabling JScript & Wscript should have minimal impact, though test before disabling VBScript.
The following registry key disables Windows Scripting, though doing so doesn’t disable it in SCT or ActiveScriptEventConsumer.
- HKEY_LOCAL_MACHINE\SOFTWARE\Microsoft\Windows Script Host\Settings
- Add new DWORD value “Enabled” and set to “0”
To disable for specific users, the following may be performed:
HKEY_CURRENT_USER\SOFTWARE\Microsoft\Windows Script Host\Settings value “Enabled” and set to “0”
Group Policy:
File extensions that open in scripting engines can be modified to open in Notepad via GPO:
- Open the Group Policy Management Console. Right-click the Group Policy object (GPO) that should contain the new preference item, and then click Edit .
- Go to User Configuration > Preferences > Control Panel Settings.
- Right click on Folder Options, Click New, Open With.
- In “File Extension”, Enter the extension and then provide the path to the program which will open this file extension. You can also opt to “Set as default”. Click OK.
- Repeat for each file type.
Disable Windows Scripting Host in the registry via GPO:
- Configure the registry setting on a reference workstation
HKEY_LOCAL_MACHINE\SOFTWARE\Microsoft\Windows Script Host\Settings\Enabled = “0” - Open the Group Policy Management Console. Right-click the Group Policy object (GPO) that should contain the new preference item, and then click Edit .
- In the console tree under Computer Configuration, expand the Preferences folder, and then expand the Windows Settings folder.
- Right-click the Registry node, point to New , and select Registry Wizard .
- Select the reference workstation on which the desired registry settings exist, then click Next .
- Browse to HKEY_LOCAL_MACHINE\SOFTWARE\Microsoft\Windows Script Host\Settings\
and select the check box for “Enabled” from which you want to create a Registry preference item. Select the check box for a key only if you want to create a Registry item for the key rather than for a value within the key. - Click Finish. The settings that you selected appear as preference items in the Registry Wizard Values collection.
Expected Level of Effort:
Low to Medium High
Expected Impact:
This may break things in the enterprise, please test first.
Deploy security back-port patch (KB2871997)
Ensure all Windows systems prior to Windows 8.1 & Windows Server 2012 R2 have the KB2871997 patch installed. This patch updates earlier supported versions of Windows with security enhancements baked into Windows 8.1 & Windows Server 2012 R2.
Additional protections in kb2871997
Expected Level of Effort:
Low
Expected Impact:
This is not likely to break things in the enterprise, but please test first.
Prevent local “administrator” accounts from authenticating over the network
While the local Administrator (RID 500) account on two different computers has a different SID, if they have the same account name and password, the local Administrator account from one can authenticate as Administrator on the other. The same is true with any local account that is duplicated on multiple computers.
This presents a security issue if multiple (or all) workstations in an organization have the same account name and password since compromise of one workstation results in compromise of all.
Windows 8.1 & Windows 2012 R2 and newer introduced two new local SIDs:
- S-1-5-113: NT AUTHORITY\Local account
- S-1-5-114: NT AUTHORITY\Local account and member of Administrators group
These SIDs are also added in earlier supported versions of Windows by installing the KB2871997 patch.
Local account network access behavior can be changed via Group Policy:
Computer Configuration\Windows Settings\Local Policies\User Rights Assignment
- Deny access to this computer from the network: Local account and member of Administrators group
- Deny log on through Remote Desktop Services: Local account and member of Administrators group
Note that using “Local account” instead also provides the same level of protection as well as blocking all local users from authenticating in this manner.
Expected Level of Effort:
Low to Medium
Expected Impact:
This is not likely to break things in the enterprise, but please test first.
Ensure WDigest is disabled
WDigest provides support for Digest authentication which is:
“An industry standard that is used in Windows Server 2003 for Lightweight Directory Access Protocol (LDAP) and Web authentication. Digest Authentication transmits credentials across the network as an MD5 hash or message digest.”
Prior to Windows 8.1 and Windows Server 2012 R2, Wdigest was enabled which placed the user’s “clear text” password in LSASS memory space in order to support basic authentication scenarios.Windows 8.1 and Windows Server 2012 R2 and newer have WDigest disabled by default by adding and setting the following registry key:HKEY_LOCAL_MACHINE\System\CurrentControlSet\Control\SecurityProviders\Wdigest\UseLogonCredential = “0”Earlier supported Windows versions with KB2871997 installed add this registry key, though WDigest is enabled and needs to be disabled by changing UseLogonCredential from “1” Enabled, to “0” DisabledKeeping WDigest enabled means that tools like Mimikatz can extract the user’s “clear-text” password.Identify who is authenticating via Wdigest:
- Server Event ID 4624
- Security ID: ADSECURITY\JoeUser
- Source Network Address: 10.10.10.221 [Workstation IP Address]
- Authentication Package: WDigest
- Domain Controller Event ID 4776
- Authentication Package: Wdigest
- Logon Account: JoeUSer
- Source Workstation: ADS-IIS01 [Server that accepted WDigest Auth]
In order to get WDIgest authentication logged on DCs, enable the appropriate auditing:
- Computer Configuration>Windows Settings>Security Settings>Advanced Audit Policy Configuration>Audit Policies>Account Logon>Audit Credential Validation>Success
Disable WDigest via Group Policy:
- Configure the registry setting on a reference workstation
HKEY_LOCAL_MACHINE\System\CurrentControlSet\Control\SecurityProviders\Wdigest\UseLogonCredential = “0” - Open the Group Policy Management Console. Right-click the Group Policy object (GPO) that should contain the new preference item, and then click Edit .
- In the console tree under Computer Configuration, expand the Preferences folder, and then expand the Windows Settings folder.
- Right-click the Registry node, point to New , and select Registry Wizard .
- Select the reference workstation on which the desired registry settings exist, then click Next .
- Browse to HKEY_LOCAL_MACHINE\System\CurrentControlSet\Control\SecurityProviders\Wdigest\
and select the check box for “UseLogonCredential” from which you want to create a Registry preference item. Select the check box for a key only if you want to create a Registry item for the key rather than for a value within the key. - Click Finish. The settings that you selected appear as preference items in the Registry Wizard Values collection.
Expected Level of Effort:
Low
Expected Impact:
This is not likely to break things in the enterprise, but please test first.
Remove SMB v1 from Windows 8.1 & Windows Server 2012 R2
Server Message Block (SMB)
SMB “operates as an application-layer network protocol[3] mainly used for providing shared access to files, printers, and serial ports and miscellaneous communications between nodes on a network. It also provides an authenticated inter-process communication mechanism. Most usage of SMB involves computers running Microsoft Windows, where it was known as “Microsoft Windows Network” before the subsequent introduction of Active Directory.”
SMB version 1 was the default for Windows 2003 & Windows 2003 and has several security issues.
Ned Pyle outlines several reasons to stop using SMBv1:
- SMB1 isn’t safe
When you use SMB1, you lose key protections offered by later SMB protocol versions:
- Pre-authentication Integrity (SMB 3.1.1+). Protects against security downgrade attacks.
- Secure Dialect Negotiation (SMB 3.0, 3.02). Protects against security downgrade attacks.
- Encryption (SMB 3.0+). Prevents inspection of data on the wire, MiTM attacks. In SMB 3.1.1 encryption performance is even better than signing!
- Insecure guest auth blocking (SMB 3.0+ on Windows 10+) . Protects against MiTM attacks.
- Better message signing (SMB 2.02+). HMAC SHA-256 replaces MD5 as the hashing algorithm in SMB 2.02, SMB 2.1 and AES-CMAC replaces that in SMB 3.0+. Signing performance increases in SMB2 and 3.
- SMB1 isn’t modern or efficient
When you use SMB1, you lose key performance and productivity optimizations for end users.
- Larger reads and writes (2.02+)- more efficient use of faster networks or higher latency WANs. Large MTU support.
- Peer caching of folder and file properties (2.02+) – clients keep local copies of folders and files via BranchCache
- Durable handles (2.02, 2.1) – allow for connection to transparently reconnect to the server if there is a temporary disconnection
- Client oplock leasing model (2.02+) – limits the data transferred between the client and server,
- improving performance on high-latency networks and increasing SMB server scalability
- Multichannel & SMB Direct (3.0+) – aggregation of network bandwidth and fault tolerance if multiple paths are available between client and server, plus usage of modern ultra-high throughout RDMA infrastructure
- Directory Leasing (3.0+) – Improves application response times in branch offices through caching
- SMB1 isn’t usually necessary
This is the real killer: there are very few cases left in any modern enterprise where SMB1 is the only option. Some legit reasons:
- You’re still running XP or WS2003 under a custom support agreement.
- You have some decrepit management software that demands admins browse via the ‘network neighborhood’ master browser list.
- You run old multi-function printers with antique firmware in order to “scan to share”.
None of these things should affect the average end user or business. Unless you let them.
Windows SMB Support by Windows OS Version:
There are several different versions of SMB used by Windows operating systems:
- CIFS – The ancient version of SMB that was part of Microsoft Windows NT 4.0 in 1996. SMB1 supersedes this version.
- SMB 1.0 (or SMB1) – The version used in Windows 2000, Windows XP, Windows Server 2003 and Windows Server 2003 R2
- SMB 2.0 (or SMB2) – The version used in Windows Vista (SP1 or later) and Windows Server 2008
- SMB 2.1 (or SMB2.1) – The version used in Windows 7 and Windows Server 2008 R2
- SMB 3.0 (or SMB3) – The version used in Windows 8 and Windows Server 2012
- SMB 3.02 (or SMB3) – The version used in Windows 8.1 and Windows Server 2012 R2
Here’s a table to help you understand what version you will end up using, depending on what Windows version is running as the SMB client and what version of Windows is running as the SMB server:
OS Windows 8.1
WS 2012 R2Windows 8
WS 2012Windows 7
WS 2008 R2Windows Vista
WS 2008Previous
versionsWindows 8.1
WS 2012 R2SMB 3.02 SMB 3.0 SMB 2.1 SMB 2.0 SMB 1.0 Windows 8
WS 2012SMB 3.0 SMB 3.0 SMB 2.1 SMB 2.0 SMB 1.0 Windows 7
WS 2008 R2SMB 2.1 SMB 2.1 SMB 2.1 SMB 2.0 SMB 1.0 Windows Vista
WS 2008SMB 2.0 SMB 2.0 SMB 2.0 SMB 2.0 SMB 1.0 Previous
versionsSMB 1.0 SMB 1.0 SMB 1.0 SMB 1.0 SMB 1.0 * WS = Windows Server
SMB Features and Capabilities:
Here’s a very short summary of what changed with each version of SMB:
- From SMB 1.0 to SMB 2.0 – The first major redesign of SMB
- Increased file sharing scalability
- Improved performance
- Request compounding
- Asynchronous operations
- Larger reads/writes
- More secure and robust
- Small command set
- Signing now uses HMAC SHA-256 instead of MD5
- SMB2 durability
- From SMB 2.0 to SMB 2.1
- File leasing improvements
- Large MTU support
- BranchCache
- From SMB 2.1 to SMB 3.0
- Availability
- SMB Transparent Failover
- SMB Witness
- SMB Multichannel
- Performance
- SMB Scale-Out
- SMB Direct (SMB 3.0 over RDMA)
- SMB Multichannel
- Directory Leasing
- BranchCache V2
- Backup
- VSS for Remote File Shares
- Security
- SMB Encryption using AES-CCM (Optional)
- Signing now uses AES-CMAC
- Management
- SMB PowerShell
- Improved Performance Counters
- Improved Eventing
- From SMB 3.0 to SMB 3.02
- Automatic rebalancing of Scale-Out File Server clients
- Improved performance of SMB Direct (SMB over RDMA)
- Support for multiple SMB instances on a Scale-Out File Server
You can get additional details on the SMB 2.0 improvements listed above at
http://blogs.technet.com/b/josebda/archive/2008/12/09/smb2-a-complete-redesign-of-the-main-remote-file-protocol-for-windows.aspxYou can get additional details on the SMB 3.0 improvements listed above at
http://blogs.technet.com/b/josebda/archive/2012/05/03/updated-links-on-windows-server-2012-file-server-and-smb-3-0.aspxYou can get additional details on the SMB 3.02 improvements in Windows Server 2012 R2 at
http://technet.microsoft.com/en-us/library/hh831474.aspx
There are several implementations of the SMB protocol from someone other than Microsoft. If you use one of those implementations of SMB, you should ask whoever is providing the implementation which version of SMB they implement for each version of their product. Here are a few of these implementations of SMB:
- Apple – Up to SMB2 implemented in OS X 10 Mavericks – http://images.apple.com/osx/preview/docs/OSX_Mavericks_Core_Technology_Overview.pdf
- EMC – Up to SMB3 implemented in VNX – http://www.emc.com/collateral/white-papers/h11427-vnx-introduction-smb-30-support-wp.pdf
- Linux (Client) – SMB 2.1 and SMB 3.0 (even minimum SMB 3.02 support) implemented in the Linux kernel 3.11 or higher – http://www.snia.org/sites/default/files2/SDC2013/presentations/Revisions/StevenFrench_SMB3_Meets_Linux_ver3_revision.pdf
- NetApp – Up to SMB3 implemented in Data ONTAP 8.2 – https://communities.netapp.com/community/netapp-blogs/cloud/blog/2013/06/11/clustered-ontap-82-with-windows-server-2012-r2-and-system-center-2012-r2-innovation-in-storage-and-the-cloud
- Samba (Server) – Up to SMB3 implemented in Samba 4.1 – http://www.samba.org/samba/history/samba-4.1.0.html
Please note that is not a complete list of implementations and the list is bound to become obsolete the minute I post it. Please refer to the specific implementers for up-to-date information on their specific implementations and which version and optional portions of the protocol they offer.
Managing SMB with PowerShell (Windows 8.1 & Windows Server 2012 R2 and up):
This Powershell command can audit SMBv1 usage:
Set-SmbServerConfiguration –AuditSmb1Access $true
The PowerShell command can disable SMB v1:
Set-SmbServerConfiguration –EnableSMB1Protocol $false
Expected Level of Effort:
Medium
Expected Impact:
This is may break things in the enterprise, please test first.
Windows 10 & Windows 2016 Specific
Windows 10/2016 Build Updates
When configuring your baseline image for Windows 10, remove the following features:
- PowerShell 2.0 Engine
- SMB 1 (breaks access to old file shares, like Windows 2003)
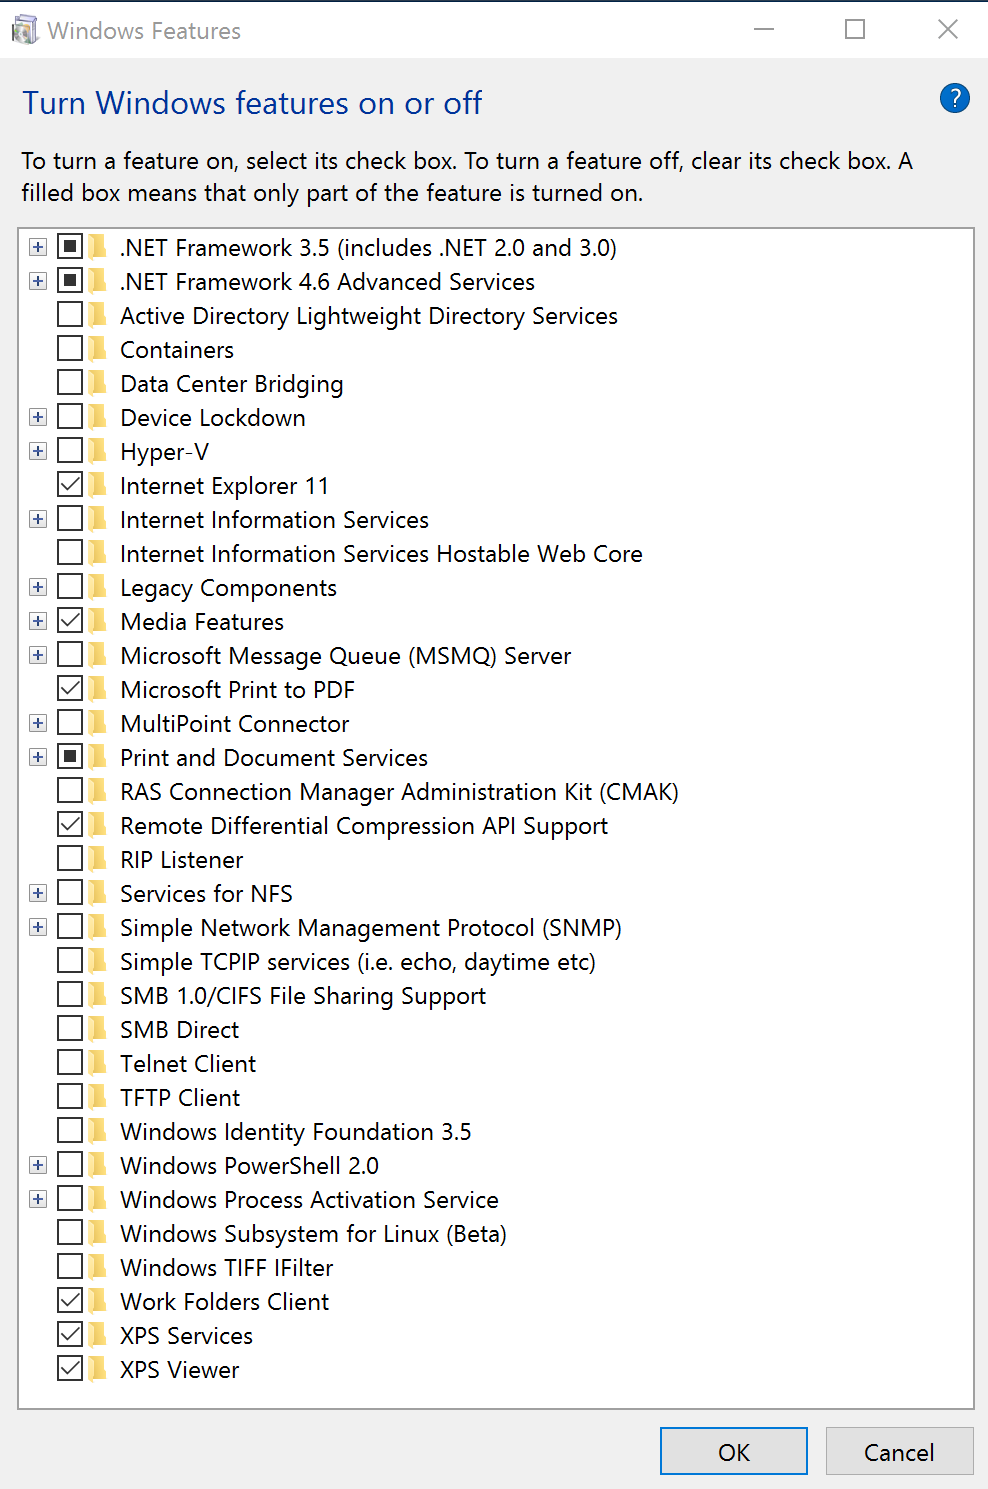
Note: In the screenshot above, .Net framewok 3.5 is enabled. This is a Microsoft SCM 4.0 requirement and is why it’s enabled on the system. Do not add .Net 3.5 (which includes .Net 2.0 & 3.0) to the Windows 10 base image.
Expected Level of Effort:
Low
Expected Impact:
This is not likely to break things in the enterprise, but please test first.
Block Untrusted Fonts
To help protect your company from attacks which may originate from untrusted or attacker controlled font files, we’ve created the Blocking Untrusted Fonts feature. Using this feature, you can turn on a global setting that stops your employees from loading untrusted fonts processed using the Graphics Device Interface (GDI) onto your network. Untrusted fonts are any font installed outside of the %windir%/Fonts directory. Blocking untrusted fonts helps prevent both remote (web-based or email-based) and local EOP attacks that can happen during the font file-parsing process.
Enable the Blocking Untrusted Fonts feature:
HKEY_LOCAL_MACHINE\SYSTEM\CurrentControlSet\Control\Session Manager\Kernel\
If the MitigationOptions key isn’t there, right-click and add a new QWORD (64-bit) Value, renaming it to MitigationOptions.
MitigationOptions key value options:
- To turn this feature on. Type 1000000000000.
- To turn this feature off. Type 2000000000000.
- To audit with this feature. Type 3000000000000.
It’s highly recommended to enable this feature in Audit mode for a week or two and check for related events. After that, flip the switch to turn it on.
Review Audit Events:
- Open Event Viewer and go to Application and Service Logs/Microsoft/Windows/Win32k/Operational.
- Review Event ID 260 events.
Event Example 1 – MS Word
WINWORD.EXE attempted loading a font that is restricted by font loading policy.
FontType: Memory
FontPath:
Blocked: true
Note: Because the FontType is Memory, there’s no associated FontPath.Event Example 2 – Winlogon
Winlogon.exe attempted loading a font that is restricted by font loading policy.
FontType: File
FontPath: \??\C:\PROGRAM FILES (X86)\COMMON FILES\MICROSOFT SHARED\EQUATION\MTEXTRA.TTF
Blocked: true
Note: Because the FontType is File, there’s also an associated FontPath.Event Example 3 – Internet Explorer running in Audit mode
Iexplore.exe attempted loading a font that is restricted by font loading policy.
FontType: Memory
FontPath:
Blocked: false
Note: In Audit mode, the problem is recorded, but the font isn’t blocked.
Block Untrusted Fonts via Group Policy:
- Configure the registry setting on a reference workstation
HKEY_LOCAL_MACHINE\SYSTEM\CurrentControlSet\Control\Session Manager\Kernel\MitigationOptions Type = 1000000000000 - Open the Group Policy Management Console. Right-click the Group Policy object (GPO) that should contain the new preference item, and then click Edit .
- In the console tree under Computer Configuration, expand the Preferences folder, and then expand the Windows Settings folder.
- Right-click the Registry node, point to New, and select Registry Wizard .
- Select the reference workstation on which the desired registry settings exist, then click Next .
- Browse to HKEY_LOCAL_MACHINE\SYSTEM\CurrentControlSet\Control\Session Manager\Kernel\
and select the check box for “MitigationOptions ” from which you want to create a Registry preference item. Select the check box for a key only if you want to create a Registry item for the key rather than for a value within the key. - Click Finish. The settings that you selected appear as preference items in the Registry Wizard Values collection.
Expected Level of Effort:
Low to Medium
Expected Impact:
This may break things in the enterprise, please test first (at least deploy in audit mode first).
Block Authenticated Users from Enumerating Local Groups on Windows 10 Workstations
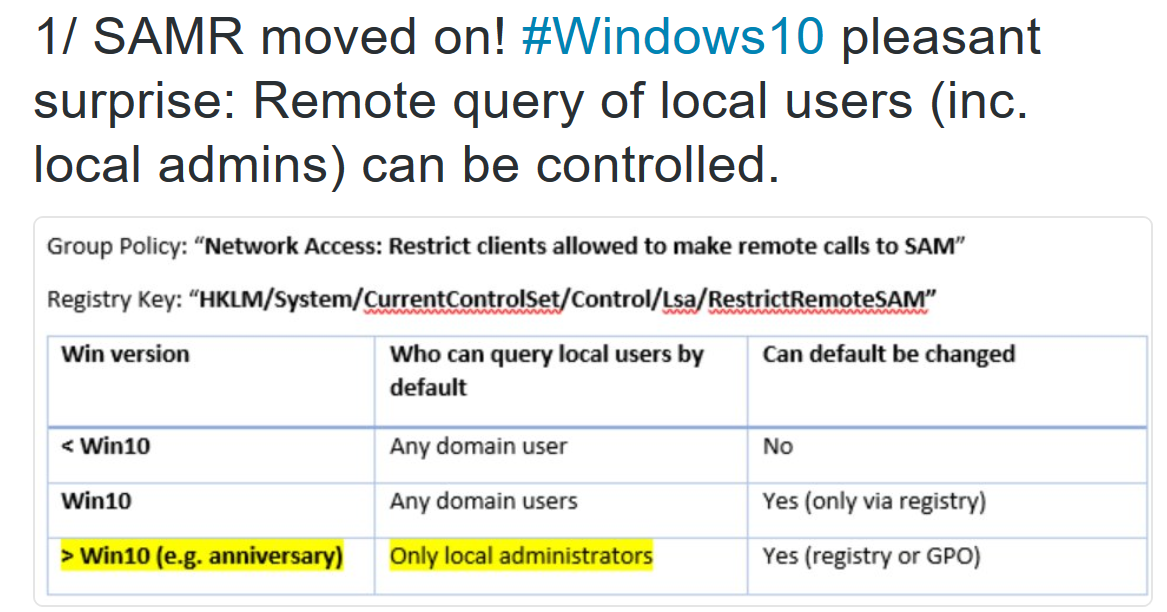
Thanks to the Microsoft ATA folks, we know that Windows 10 Anniversary Update (v1607) restricts remote SAMR calls (default) to only local administrators.
When using PowerView to enumerate local group membership on Windows 10 v1607 as a domain user, we get the following error

Enable Credential Guard
Configure Device Guard
Matt Graeber’s Device Guard rules to mitigate bypasses
Application Settings
Disable Office Macros
The term Office Macro sounds like a nice helper in an Office document. The reality is that a macro is code that runs on the computer. This code is written in Visual Basic (VBA) and can be used to help, or used maliciously.
According to Microsoft, “In the enterprise, recent data from our Office 365 Advanced Threat Protection service indicates 98% of Office-targeted threats use macros.“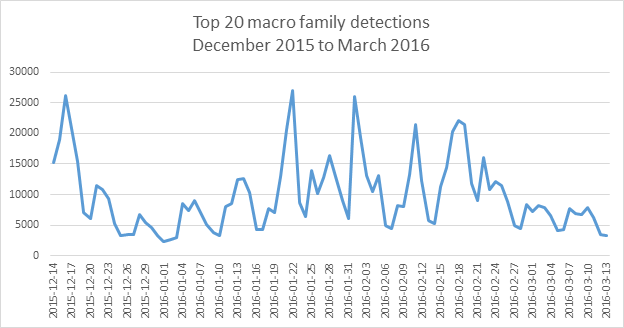 Macros are disabled by default in current versions of Office (VBA was enabled in Office 2010), but some organizations have users who require macro functionality. This complicates managing macros.Starting with Office 2007, there are several options to control macros
- Disable all macros without notification
- Disable all macros with notification
- Disable all macros except digitally signed macros
- Enable all macros (not recommended, potentially dangerous code can run)
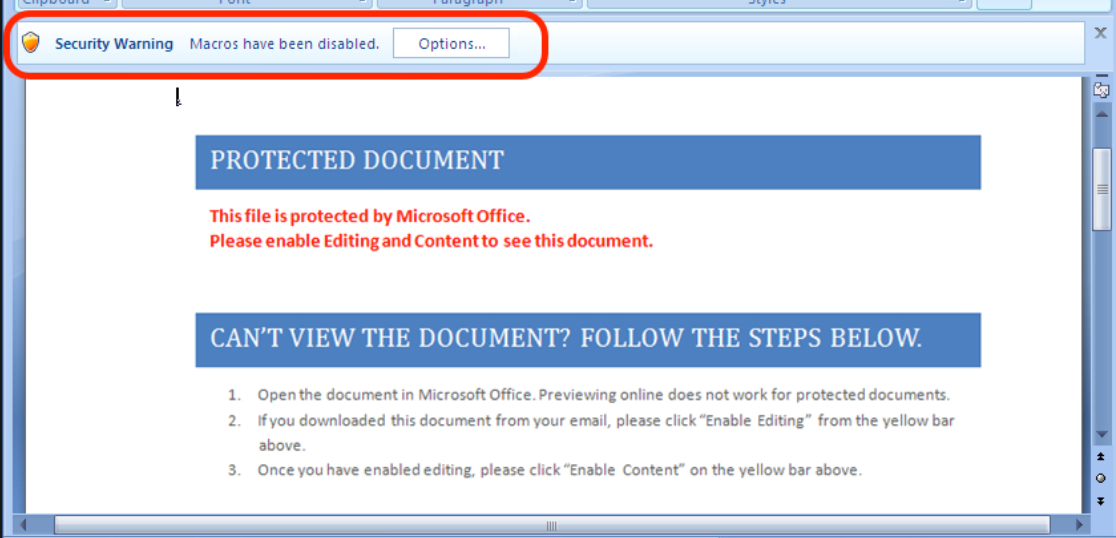
Some organizations configure Office to block macros with notification, but users are able to enable macros – a fact that phishers take advantage of.
Microsoft Office 2013 introduced the Telemetry Dashboard which can be used to determine macro usage, though it’s disabled by default.
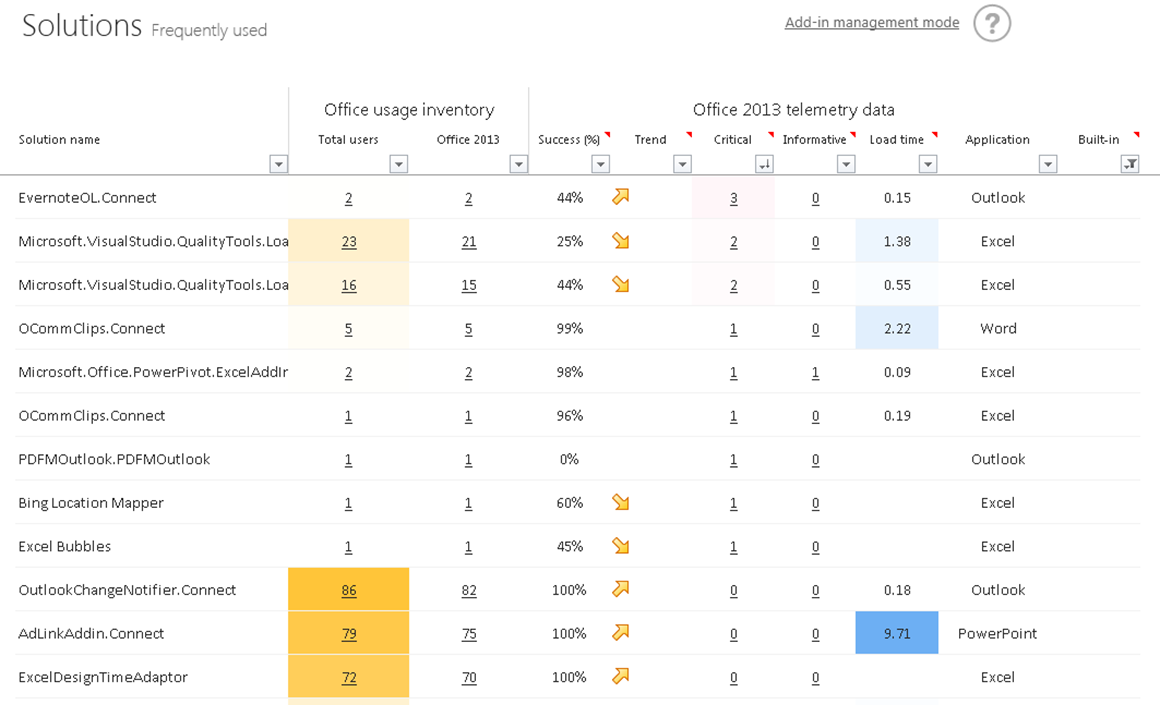
Enable by using Group Policy, registry settings, or by selecting the Enable Logging button in Telemetry Log
https://technet.microsoft.com/en-us/library/jj863580.aspx
Assuming you are running Office 2007 and newer, block all macros without notification for all users.
If you have a subset of users who require macros, you can lower the restriction to those users so they can use digitally signed macros.
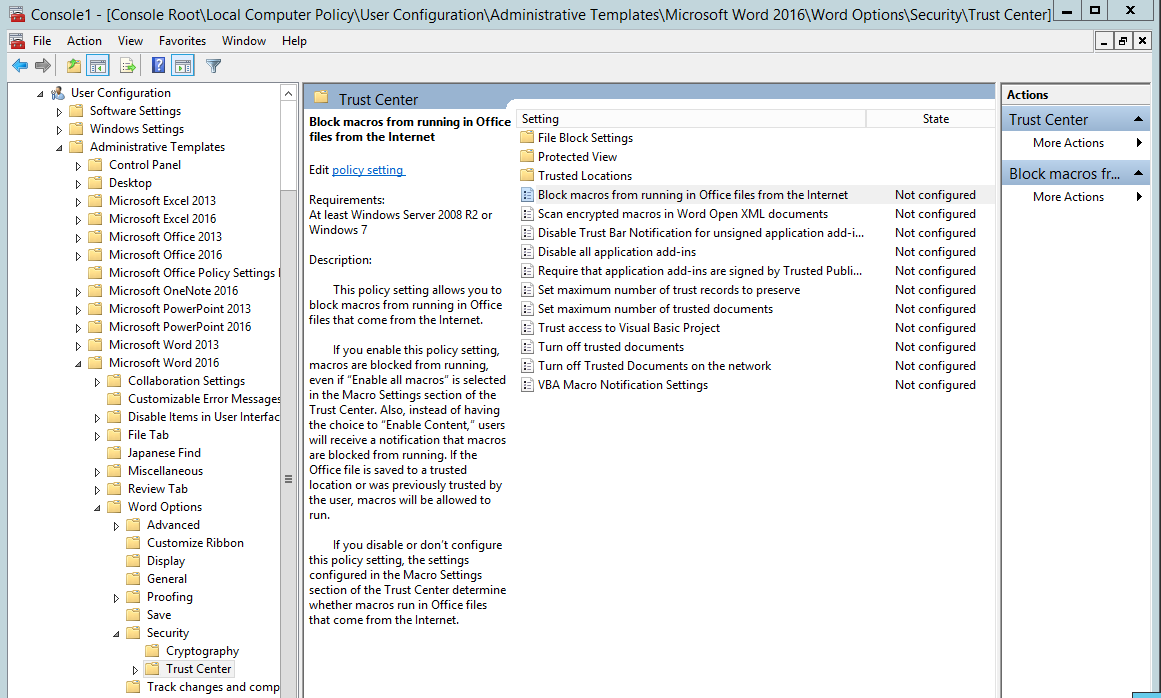
Office 2016 introduced a new setting, which has since been backported to Office 2013 in KB3177451, (get the Office 2016 Group Policy administrative templates to configure via GPO) which provides the ability to “Block macros from running in Office files from the Internet.”
This policy setting allows you to block macros from running in Office files that come from the Internet. If you enable this policy setting, macros are blocked from running, even if “Enable all macros” is selected in the Macro Settings section of the Trust Center. Also, instead of having the choice to “Enable Content,” users will receive a notification that macros are blocked from running. If the Office file is saved to a trusted location or was previously trusted by the user, macros will be allowed to run. If you disable or don’t configure this policy setting, the settings configured in the Macro Settings section of the Trust Center determine whether macros run in Office files that come from the Internet.
This option provides another level of granularity for organizations which have users who have to use macros in files within their organization, but have issues with signing those macros.
Microsoft describes this feature:
This feature can be controlled via Group Policy and configured per application. It enables enterprise administrators to block macros from running in Word, Excel and PowerPoint documents that come from the Internet. This includes scenarios such as the following:
- Documents downloaded from Internet websites or consumer storage providers (like OneDrive, Google Drive, and Dropbox).
- Documents attached to emails that have been sent from outside the organization (where the organization uses the Outlook client and Exchange servers for email)
- Documents opened from public shares hosted on the Internet (such as files downloaded from file-sharing sites).
Group policy:
- Open the Group Policy Management Console, right-click the Group Policy Object you want to configure and click Edit.
- In the Group Policy Management Editor, go to User configuration.
- Click Administrative templates > Microsoft Word 2016 > Word options > Security > Trust Center.
- Open the Block macros from running in Office files from the Internet setting to configure and enable it.
Expected Level of Effort:
Low to Medium
Expected Impact:
This may break things in the enterprise, please test first.
Disable Office OLE
You have disabled all Office macros in your organization, so you’re good right?
Not exactly. There’s a technology for embedding files from Windows ancient times called OLE Package (packager.dll) which provides attackers the ability to trick users into running code on their system simply by opening the attachment.
In fact, Will Harmjoy (Harmj0y.net) & I demonstrated how embedded OLE can bypass most organization’s perimiter security and execute attacker code even when Office macros are disabled:
DerbyCon 6 (2016) Slides (PDF)
DerbyCon 6 (2016) Presentation Video (YouTube)
According to Kevin Beaumont, this affects Outlook 2003 through Outlook 2016.
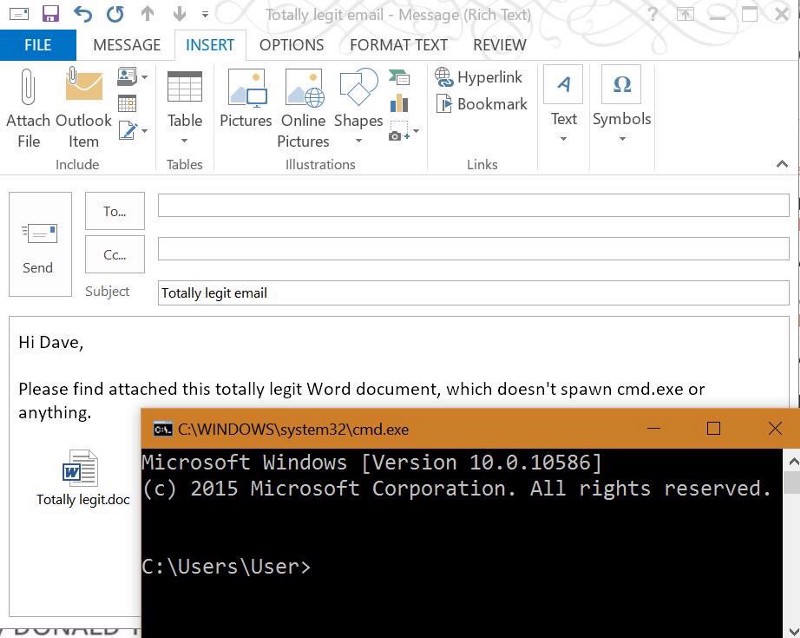
Screenshot by Kevin Beaumont
Kevin provides several mitigations for this issue:
- Application whitelisting. However, be careful for signed executables with parameters being embedded. E.g. there are many Microsoft digitally signed tools you can use to springboard for other content, and because they’re Microsoft you’ve probably already trusted their publisher certificate.
- Deploy the registry key ShowOLEPackageObj, for your version(s) of Office, to silently disable OLE Package function in Outlook. There is no way to disable it in wider Office, however, so attackers can still embed inside Word, Excel and PowerPoint.
HKEY_CURRENT_USER\SOFTWARE\Microsoft\Office\15.0\Outlook\Security\ShowOLEPackageObj = “0” (disabled)
- EMET. If you run Microsoft EMET (or a similar product such as Palo-Alto TRAPS), add this mitigation for Outlook.exe:
<Mitigation Name=”ASR” Enabled=”true”>
<asr_modules>packager.dll</asr_modules
</Mitigation>
By stopping packager.dll, you stop the issue.
Group Policy:
The simplest method to deploy mitigation is to create a Group Policy and link to the OU(s) containing users:
- Set this registry key on a reference workstation:
HKEY_CURRENT_USER\SOFTWARE\Microsoft\Office\###\Outlook\Security\
Add new Ddword (32-bit) value: ShowOLEPackageObj = “0” (disabled)Where “###” is the current version of Office installed
| Office Version | Value |
| Office 2016 | 16.0 |
| Office 2013 | 15.0 |
| Office 2010 | 14.0 |
| Office 2007 | 12.0 |
- Open the Group Policy Management Console. Right-click the Group Policy object (GPO) that should contain the new preference item, and then click Edit .
- In the console tree under Computer Configuration, expand the Preferences folder, and then expand the Windows Settings folder.
- Right-click the Registry node, point to New , and select Registry Wizard .
- Select the reference workstation on which the desired registry settings exist, then click Next .
- Browse to HKEY_CURRENT_USER\SOFTWARE\Microsoft\Office\###\Outlook\Security\ and select the check box for “ShowOLEPackageObj ” to create a Registry preference item. Select the check box for a key only if you want to create a Registry item for the key rather than for a value within the key.
- Click Finish . The settings that you selected appear as preference items in the Registry Wizard Values collection.
If your organization has deployed EMET (which it should), update the EMET configuration file with the following:
<Mitigation Name=”ASR” Enabled=”true”>
<asr_modules>packager.dll</asr_modules>
</Mitigation>
Configure this via Group Policy: https://technet.microsoft.com/en-us/itpro/windows/keep-secure/override-mitigation-options-for-app-related-security-policies
Expected Level of Effort:
Low to Medium
Expected Impact:
This is not likely to break things in the enterprise, but please test first.
Windows Group Policy Settings
Configure Lanman Authentication to a secure setting
Configure Lanman authentication to “Send NTLMv2 response only” to enforce authentication security.
For better security, configure this setting to “Send NTLMv2 response only. Refuse LM & NTLM”Group Policy configuration:
- Computer Configuration\Windows Settings\Security Settings\Local Policies\Security Options
| Setting | Description | Registry security level |
| Send LM & NTLM responses | Client computers use LM and NTLM authentication, and they never use NTLMv2 session security. Domain controllers accept LM, NTLM, and NTLMv2 authentication. | 0 |
| Send LM & NTLM – use NTLMv2 session security if negotiated | Client computers use LM and NTLM authentication, and they use NTLMv2 session security if the server supports it. Domain controllers accept LM, NTLM, and NTLMv2 authentication. | 1 |
| Send NTLM response only | Client computers use NTLMv1 authentication, and they use NTLMv2 session security if the server supports it. Domain controllers accept LM, NTLM, and NTLMv2 authentication. | 2 |
| Send NTLMv2 response only | Client computers use NTLMv2 authentication, and they use NTLMv2 session security if the server supports it. Domain controllers accept LM, NTLM, and NTLMv2 authentication. | 3 |
| Send NTLMv2 response only. Refuse LM | Client computers use NTLMv2 authentication, and they use NTLMv2 session security if the server supports it. Domain controllers refuse to accept LM authentication, and they will accept only NTLM and NTLMv2 authentication. | 4 |
| Send NTLMv2 response only. Refuse LM & NTLM | Client computers use NTLMv2 authentication, and they use NTLMv2 session security if the server supports it. Domain controllers refuse to accept LM and NTLM authentication, and they will accept only NTLMv2 authentication. | 5 |
In Windows Vista, Windows Server 2008, Windows 7, and Windows Server 2008 R2, the default is Send NTLMv2 response only. Check to see if you are overriding this with another GPO.
Expected Impact:
This could very well break things in the enterprise, please test first.
Configure restrictions for unauthenticated RPC clients
This policy setting configures the RPC Runtime on an RPC server to restrict unauthenticated RPC clients from connecting to the RPC server. A client will be considered an authenticated client if it uses a named pipe to communicate with the server or if it uses RPC Security. RPC interfaces that have specifically asked to be accessible by unauthenticated clients may be exempt from this restriction, depending on the selected value for this policy.
If you enable this policy setting, the following values are available:
• None. Allows all RPC clients to connect to RPC servers that run on the computer on which the policy is applied.
• Authenticated. Allows only authenticated RPC clients to connect to RPC servers that run on the computer on which the policy is applied. Interfaces that have asked to be exempt from this restriction will be granted an exemption.
• Authenticated without exceptions. Allows only authenticated RPC clients to connect to RPC servers that run on the computer on which the policy is applied. No exceptions are allowed.
Group Policy:
Computer Configuration\Administrative Templates\System\Remote Procedure Call to “Enabled”
RPC Runtime Unauthenticated Client Restriction to Apply: Authenticated
Expected Impact:
This is not likely to break things in the enterprise, but please test first.
Configure NTLM session security
You can enable all of the options for this policy setting to help protect network traffic that uses the NTLM Security Support Provider (NTLM SSP) from being exposed or tampered with by an attacker who has gained access to the same network. In other words, these options help protect against man-in-the-middle attacks.
This policy setting determines which behaviors are allowed for applications using the NTLM Security Support Provider (SSP). The SSP Interface (SSPI) is used by applications that need authentication services. The setting does not modify how the authentication sequence works but instead require certain behaviors in applications that use the SSPI.
The possible values for the Network security: Minimum session security for NTLM SSP based (including secure RPC) clients setting are:
– Require message confidentiality. This option is only available in Windows XP and Windows Server 2003, the connection will fail if encryption is not negotiated. Encryption converts data into a form that is not readable until decrypted.
– Require message integrity. This option is only available in Windows XP and Windows Server 2003, the connection will fail if message integrity is not negotiated. The integrity of a message can be assessed through message signing. Message signing proves that the message has not been tampered with; it attaches a cryptographic signature that identifies the sender and is a numeric representation of the contents of the message.
– Require 128-bit encryption. The connection will fail if strong encryption (128-bit) is not negotiated.
– Require NTLMv2 session security. The connection will fail if the NTLMv2 protocol is not negotiated.
– Not Defined.
Group Policy:
Computer Configuration\Windows Settings\Security Settings\Local Policies\Security Options
Network security: Minimum session security for NTLM SSP based (including secure RPC) client
Expected Impact:
This is may break things in the enterprise, please test first.
Important Note Before Applying:
These are only recommendations. You are responsible for testing and identifying issues before deploying.
I am not responsible if you break your environment. Configuring any of these settings could negatively impact your environment – test before applying. Though configuring as many of these as possible will improve the security of your systems.

5 comments
Skip to comment form
Excellent write-up! Thanks for publishing this.
You can also remove SMB1 from Windows 8.1. And I sure wish you would. 🙂
Excellent article, as always, Sean.
Very nice comprehensive list – thanks!
Great write-up nice good list of findings that are over and above what STIG/CIS currently dictates.
One of the best blogposts I have seen in a long time. Great work.
Also I suggest to remove the possibility to run .hta extensions. It is no problem wrapping vb scripts inside a HTA.